开始使用 wp-env
概述
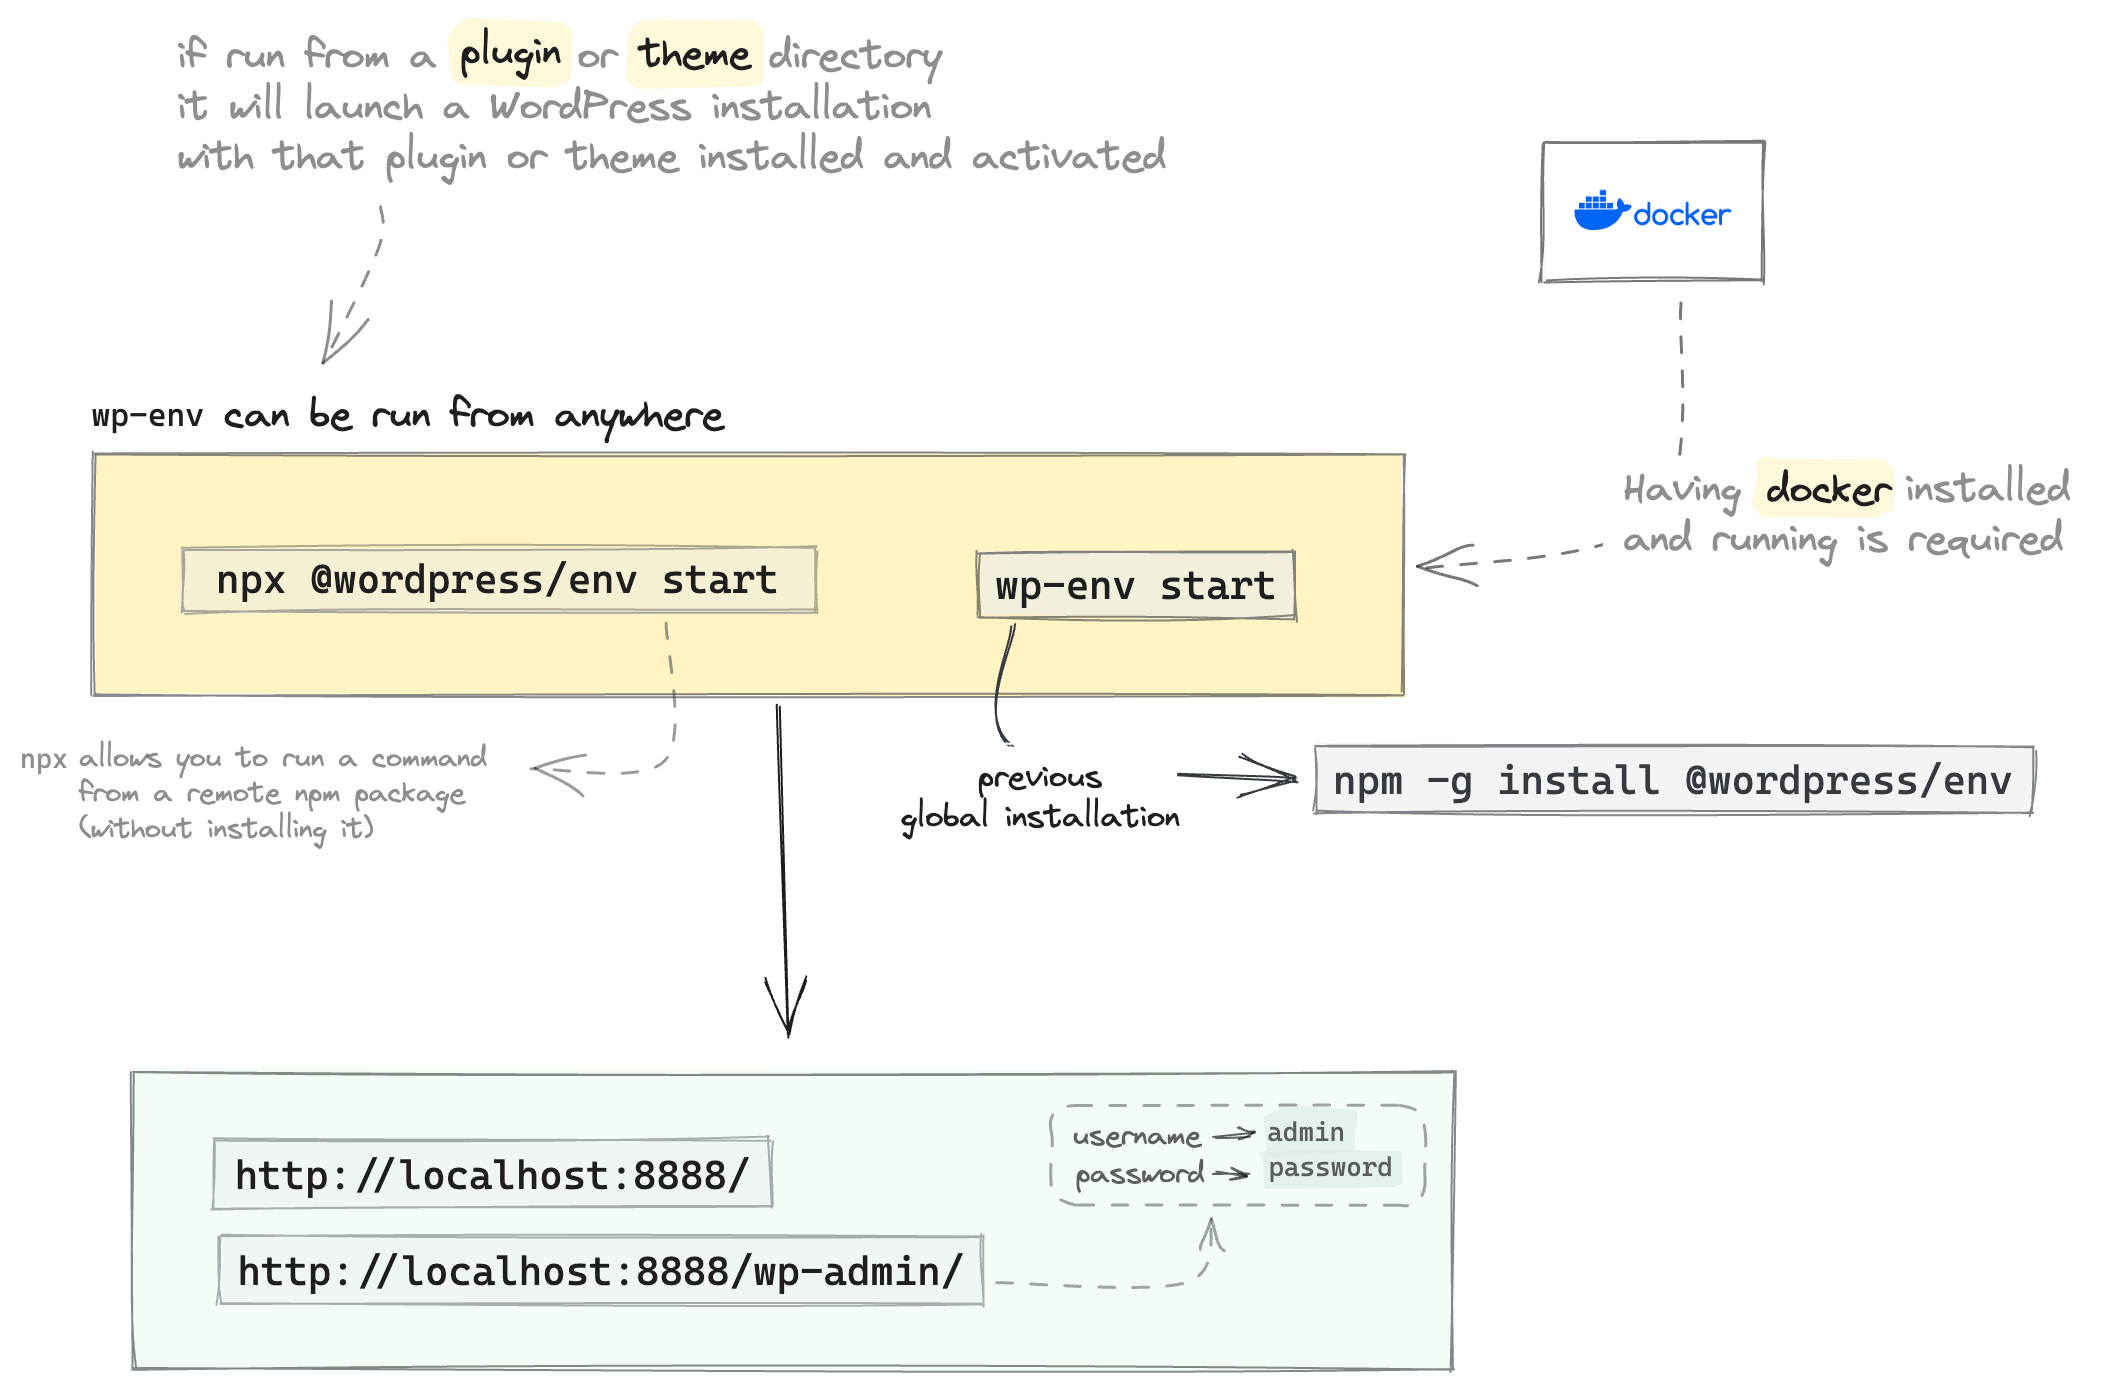
wp-env 是一个基于 Docker 的工具,用于快速搭建本地 WordPress 环境,无需额外配置,适用于插件和主题的开发与测试。
关键要点
- 安装前提:需要先安装 Node.js 和 Docker Desktop。
- 快速启动:通过 npm 全局安装 @wordpress/env,在插件、主题或任意目录运行 wp-env start 启动环境。
- 环境访问:启动后可通过 http://localhost:8888 访问,默认管理员凭据为 admin/password。
- 配置选项:支持 .wp-env.json 文件自定义环境,适用于多插件或主题项目。
- 卸载与重置:提供 wp-env clean all、wp-env destroy 和 npm -g uninstall 命令进行清理。
- 故障排除:常见错误包括 Docker 未启动或端口冲突,提供 Ubuntu 特定设置指导。
注意事项
- 某些项目(如 Gutenberg)可能有自定义配置,需运行 npm run wp-env start。
- 在非插件/主题目录运行 wp-env start 会创建通用环境并显示警告。
- Ubuntu 20.04.1 之前版本需额外配置 Docker 以解决连接问题。
The @wordpress/env package (wp-env) lets you set up a local WordPress environment (site) for building and testing plugins and themes, without any additional configuration.
Before following this guide, install Node.js development tools if you have not already done so.
Quick start
- Download, install, and start Docker Desktop following the instructions for your operating system.
- Run
npm -g install @wordpress/envin the terminal to installwp-envglobally. - In the terminal, navigate to an existing plugin directory, theme directory, or a new working directory.
- Run
wp-env startin the terminal to start the local WordPress environment. - After the script runs, navigate to
http://localhost:8888/wp-adminand log into the WordPress dashboard using usernameadminand passwordpassword.
Set up Docker Desktop
The wp-env tool uses Docker to create a virtual machine that runs the local WordPress site. The Docker Desktop application is free for small businesses, personal use, education, and non-commercial open-source projects. See their FAQ for more information.
Use the links below to download and install Docker Desktop for your operating system.
If you are using a version of Ubuntu prior to 20.04.1, see the additional troubleshooting notes below.
After successful installation, start the Docker Desktop application and follow the prompts to get set up. You should generally use the recommended (default) settings, and creating a Docker account is optional.
Install and run wp-env
The wp-env tool is used to create a local WordPress environment with Docker. So, after you have set up Docker Desktop, open the terminal and install the wp-env by running the command:
npm -g install @wordpress/env
This will install the wp-env globally, allowing the tool to be run from any directory. To confirm it’s installed and available, run wp-env --version, and the version number should appear.
Next, navigate to an existing plugin directory, theme directory, or a new working directory in the terminal and run:
wp-env start
Once the script completes, you can access the local environment at: http://localhost:8888. Log into the WordPress dashboard using username admin and password password.
wp-env configurations, and the documentation might prompt you to run npm run wp-env start instead.
For more information on controlling the Docker environment, see the @wordpress/env package readme.
Where to run wp-env
The wp-env tool can run from practically anywhere. When using the script while developing a single plugin, wp-env start can mount and activate the plugin automatically when run from the directory containing the plugin. This also works for themes when run from the directory in which you are developing the theme.
A generic WordPress environment will be created if you run wp-env start from a directory that is not a plugin or theme. The script will display the following warning, but ignore if this is your intention.
!! Warning: could not find a .wp-env.json configuration file and could not determine if 'DIR' is a WordPress installation, a plugin, or a theme.
You can also use the .wp-env.json configuration file to create an environment that works with multiple plugins and/or themes. See the @wordpress/env package readme for more configuration details.
Uninstall or reset wp-env
Here are a few instructions if you need to start over or want to remove what was installed.
- If you just want to reset and clean the WordPress database, run
wp-env clean all - To remove the local environment completely for a specific project, run
wp-env destroy - To globally uninstall the
wp-envtool, runnpm -g uninstall @wordpress/env
Troubleshooting
Common errors
When using wp-env, it’s common to get the error: Error while running docker-compose command
- Check that Docker Desktop is started and running.
- Check Docker Desktop dashboard for logs, restart, or remove existing virtual machines.
- Then try rerunning
wp-env start.
If you see the error: Host is already in use by another container
- The container you are attempting to start is already running, or another container is. You can stop an existing container by running
wp-env stopfrom the directory that you started it in. - If you do not remember the directory where you started
wp-env, you can stop all containers by runningdocker stop $(docker ps -q). This will stop all Docker containers, so use with caution. - Then try rerunning
wp-env start.
Ubuntu Docker setup
If you are using a version of Ubuntu prior to 20.04.1, you may encounter errors when setting up a local WordPress environment with wp-env.
To resolve this, start by following the installation guide from Docker. docker-compose is also required, which you may need to install separately. Refer to the Docker compose documentation.
Once Docker and wp-env are installed, and assuming wp-env is configured globally, try running wp-env start in a directory. If you run into this error:
ERROR: Couldn't connect to Docker daemon at http+docker://localhost - is it running?

If it's at a non-standard location, specify the URL with the DOCKER_HOST environment variable.
First, make sure Docker is running. You can check by running ps -ef | grep docker, which should return something like:
/usr/bin/dockerd -H fd:// --containerd=/run/containerd/containerd.sock
If Docker is not running, try starting the service by running sudo systemctl start docker.service.
If Docker is running, then it is not listening to how the WordPress environment is trying to communicate. Try adding the following service override file to include listening on tcp. See this Docker documentation on how to configure remote access for Docker daemon.
# /etc/systemd/system/docker.service.d/override.conf
[Service]
ExecStart=
ExecStart=/usr/bin/dockerd -H fd:// -H tcp://0.0.0.0:2376
Restart the service from the command-line:
sudo systemctl daemon-reload
sudo systemctl restart docker.service
After restarting the services, set the environment variable DOCKER_HOST and try starting wp-env with:
export DOCKER_HOST=tcp://127.0.0.1:2376
wp-env start
Your environment should now be set up at http://localhost:8888.
Additional resources
- @wordpress/env (Official documentation)
- Docker Desktop (Official documentation)
- Quick and easy local WordPress development with wp-env (WordPress Developer Blog)
- wp-env: Simple Local Environments for WordPress (Make WordPress Core Blog)
wp-envBasics diagram (Excalidraw)