自定义页眉
概述
自定义页眉允许站点所有者上传自定义标题图像,可放置在页面顶部,通过后台外观 > 页眉部分的可视编辑器进行裁剪和定制。支持灵活布局和响应式设计,使用 get_custom_header() 在主题中显示,但需先在 functions.php 文件中通过 add_theme_support() 启用。
关键要点
- 自定义页眉是可选的,用户可通过 WordPress 主题定制器更改页眉图像。
- 启用自定义页眉需在 functions.php 中使用 add_theme_support('custom-header'),并可传递参数数组配置默认图像、尺寸、文本等选项。
- 灵活页眉通过设置 'flex-width' 和 'flex-height' 为 true 实现,允许用户上传任意尺寸图像而无需裁剪。
- 显示自定义页眉使用 get_header_image() 或 header_image() 函数,并在 header.php 文件中嵌入代码。
- WordPress 3.4 及以上版本支持自定义页眉,旧版本需使用 add_custom_image_header() 进行向后兼容。
代码示例
<?php
function themename_custom_header_setup() {
	$args = array(
		'default-image'      => get_template_directory_uri() . 'img/default-image.jpg',
		'default-text-color' => '000',
		'width'              => 1000,
		'height'             => 250,
		'flex-width'         => true,
		'flex-height'        => true,
	);
	add_theme_support( 'custom-header', $args );
}
add_action( 'after_setup_theme', 'themename_custom_header_setup' );
注意事项
- 自定义页眉需在 after_setup_theme 钩子中注册,以确保主题加载后生效。
- 设置 'header-text' 为 false 可完全移除页眉文本选项,但无法强制用户显示文本。
- 使用 register_default_headers() 注册默认图像,以便在定制器中提供可选图像。
- 灵活页眉的宽度和高度参数作为建议尺寸,而非固定值。
Custom Header
Custom headers allow site owners to upload their own “title” image to their site, which can be placed at the top of certain pages. These can be customized and cropped by the user through a visual editor in the Appearance > Header section of the admin panel. You may also place text beneath or on top of the header. To support fluid layouts and responsive design, these headers may also be flexible. Headers are placed into a theme using get_custom_header(), but they must first be added to your functions.php file using add_theme_support(). Custom headers are optional.
To set up a basic, flexible, custom header with text you would include the following code:
<?php
function themename_custom_header_setup() {
	$args = array(
		'default-image'      => get_template_directory_uri() . 'img/default-image.jpg',
		'default-text-color' => '000',
		'width'              => 1000,
		'height'             => 250,
		'flex-width'         => true,
		'flex-height'        => true,
	);
	add_theme_support( 'custom-header', $args );
}
add_action( 'after_setup_theme', 'themename_custom_header_setup' );
The after_setup_theme hook is used so that custom headers are registered after the theme is loaded.
What are Custom Headers?
When you enable Custom Headers in your theme, users can change their header image using the WordPress theme Customizer. This gives users more control and flexibility over the look of their site.
Add Custom Header Support to your Theme
To enable Custom Headers in your theme, add the following to your functions.php file:
add_theme_support( 'custom-header' );When enabling Custom Headers, you can configure several other options by passing along arguments to the add_theme_support() function.
You can pass specific configuration options to the add_theme_support function using an array:
<?php
function themename_custom_header_setup() {
	$defaults = array(
		// Default Header Image to display.
		'default-image'          => get_template_directory_uri() . '/images/headers/default.jpg',
		// Display the header text along with the image.
		'header-text'            => false,
		// Header text color default.
		'default-text-color'     => '000',
		// Header image width (in pixels).
		'width'                  => 1000,
		// Header image height (in pixels).
		'height'                 => 198,
		// Header image random rotation default.
		'random-default'         => false,
		// Enable upload of image file in admin.
		'uploads'                => false,
		// Function to be called in theme head section.
		'wp-head-callback'       => 'wphead_cb',
		// Function to be called in preview page head section.
		'admin-head-callback'    => 'adminhead_cb',
		// Function to produce preview markup in the admin screen.
		'admin-preview-callback' => 'adminpreview_cb',
	);
}
add_action( 'after_setup_theme', 'themename_custom_header_setup' );
Flexible Header Image
If flex-height or flex-width are not included in the array, height and width will be fixed sizes. If flex-height and flex-width are included, height and width will be used as suggested dimensions instead.
Header text
By default, the user will have the option of whether or not to display header text over the image. There is no option to force the header text on the user, but if you want to remove the header text completely, you can set ‘header-text’ to ‘false’ in the arguments. This will remove the header text and the option to toggle it.
Examples
Set a custom header image
When the user first installs your theme, you can include a default header that will be selected before they choose their own header. This allows users to set up your theme more quickly and use your default image until they’re ready to upload their own.
Set a default header image 980px width and 60px height:
<?php
$header_info = array(
	'width'         => 980,
	'height'        => 60,
	'default-image' => get_template_directory_uri() . '/images/sunset.jpg',
);
add_theme_support( 'custom-header', $header_info );

$header_images = array(
	'sunset' => array(
		'url'           => get_template_directory_uri() . '/images/sunset.jpg',
		'thumbnail_url' => get_template_directory_uri() . '/images/sunset_thumbnail.jpg',
		'description'   => 'Sunset',
	),
	'flower' => array(
		'url'           => get_template_directory_uri() . '/images/flower.jpg',
		'thumbnail_url' => get_template_directory_uri() . '/images/flower_thumbnail.jpg',
		'description'   => 'Flower',
	),
);
register_default_headers( $header_images );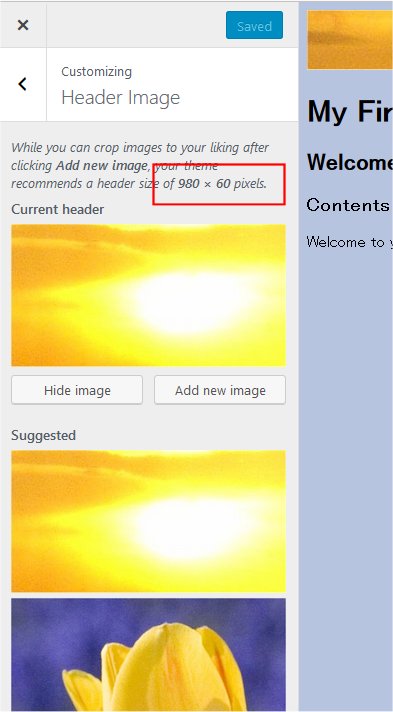
Do not forget to call register_default_headers() to register a default image. In this example, sunset.jpg is the default image and flower.jpg is an alternative selection in Customizer.
From Administration Screen, Click Appearance > Header to display Header Image menu in Customizer. Notice that width and height specified in add_theme_support() is displayed as recommended size, and flower.jpg is shown as selectable option.
Use flexible headers
By default, the user will have to crop any images they upload to fit in the width and height you specify. However, you can let users upload images of any height and width by specifying ‘flex-width’ and ‘flex-height’ as true. This will let the user skip the cropping step when they upload a new photo.
Set flexible headers:
<?php
$args = array(
	'flex-width'    => true,
	'width'         => 980,
	'flex-height'   => true,
	'height'        => 200,
	'default-image' => get_template_directory_uri() . '/images/header.jpg',
);
add_theme_support( 'custom-header', $args );
update your header.php file to:
<img alt="" src="<?php header_image(); ?>" width="<?php echo absint( get_custom_header()->width ); ?>" height="<?php echo absint( get_custom_header()->height ); ?>">Displaying Custom Header
To display the custom header, function get_header_image() retrieves the header image. get_custom_header() gets the custom header data.
E.g. below shows how custom header images can be used to display the header in the theme. The below code goes into header.php file.
<?php if ( get_header_image() ) : ?>
	<div id="site-header">
		<a href="<?php echo esc_url( home_url( '/' ) ); ?>" rel="home">
			<img src="<?php header_image(); ?>" width="<?php echo absint( get_custom_header()->width ); ?>" height="<?php echo absint( get_custom_header()->height ); ?>" alt="<?php echo esc_attr( get_bloginfo( 'name', 'display' ) ); ?>">
		</a>
	</div>
<?php endif; ?>
Backwards Compatibility
Custom Headers are supported in WordPress 3.4 and above. If you’d like your theme to support WordPress installations that are older than 3.4, you can use the following code instead of add_theme_support( ‘custom-header’);
<?php
global $wp_version;
if ( version_compare( $wp_version, '3.4', '>=' ) ) :
	add_theme_support( 'custom-header' );
else :
	add_custom_image_header( $wp_head_callback, $admin_head_callback );
endif;
Function Reference
- header_image() Display header image URL.
- get_header_image() Retrieve header image for custom header.
- get_custom_header() Get the header image data.
- get_random_header_image() Retrieve header image for custom header.
- add_theme_support() Registers theme support for a given feature.
- register_default_headers() Registers a selection of default headers to be displayed by the Customizer.