测试驱动 WordPress
概述
本文档介绍了在非公开环境下测试 WordPress 网站变更的多种方法,包括创建沙盒、隐藏测试区域和在本地计算机上安装 WordPress。这些方法旨在帮助开发者安全地进行主题开发、插件测试和网站重构,避免影响线上环境。
关键要点
- 创建沙盒:通过保存页面和样式表到本地文件夹,用于测试 WordPress 主题和 CSS 样式,但限制使用插件和其他高级功能。
- 隐藏测试区域:使用 .htaccess 文件在 Apache 服务器上限制对 WordPress 测试站点的访问,需熟悉服务器配置。
- 本地安装 WordPress:在计算机上安装 WordPress(如使用 XAMPP 或 MAMP),提供完全控制,支持插件、模板和主题测试,无需网络带宽。
- 沙盒使用技巧:包括频繁备份、追踪 DIV 和 CLASS、添加注释、小步修改以及避免直接修改模板文件。
- 迁移沙盒到主题:完成测试后,将样式表和图形文件上传到 WordPress 主题文件夹,并相应更新模板文件。
- 安装另一个博客:通过更改表前缀和清除更新服务,创建隔离的测试环境,防止意外公开。
- 移动测试站点到网站:文档预告了如何将本地测试站点迁移回主机服务器。
代码示例
<style type="text/css" media="screen">
@import url('/wp-content/themes/yourtheme/style.css');
</style>

<link rel="stylesheet" type="text/css" media="screen" href="style.css" />
注意事项
- 使用 .htaccess 文件隐藏测试区域时,需确保服务器支持并正确配置权限。
- 本地安装 WordPress 时,如果允许外部访问,必须增强安全设置,避免安全风险。
- 在沙盒中修改样式时,建议小步进行并频繁检查,以快速定位问题。
- 迁移数据库时,需更新 SQL 文件中的 URL 以匹配本地环境。
There are times when you need to test changes to your WordPress powered site out of the public eye. Making changes to a live site could adversely affect your readers.
You have several choices.
Creating a Sandbox
Do this for test driving your WordPress Theme and style sheet, allowing you to develop your WordPress Theme on your computer. This limits you to only working on CSS and not using plugins and other power features of WordPress. This is best for just styling a page.
Hiding Your WordPress Test Area
You can also close off access to your WordPress test site on your website server. This involves some familiarity with .htaccess and Apache, but it allows you to continue working on the Internet while not exposing your test site to the public.
Install WordPress on Your Computer
If you are determined to put WordPress through its paces, you can install WordPress on your own computer with a few modifications. This allows you total control over the actions and capabilities of WordPress. You can still use plugins, template files, Themes, and redesign everything as if it were on the Internet without using bandwidth or suffering with slow Internet access times. We have two sets of explanation for this: Installing a New Installation on Your Computer and Installing an Existing WordPress Site. We also cover Moving WordPress Onto Your Website after you have finished developing your site on your computer.
Creating a Sandbox
A Sandbox is a term related to the sandbox you might have played in and built sand castles in as a child. It is a playground for working on concepts and exploring your imagination. A WordPress Sandbox is basically a copy of a generated page on a WordPress site that is saved to your hard drive for you to play with as you develop your final theme and look for your site.
WordPress uses different template files to generate different views on your site. In general, there is the front page view, the single post view, and the multi-post view, used for categories, archives, and search. For more information on the structure of WordPress Themes, see Site Architecture 1.5. As different page views use different CSS styles, at the least you need to put three page views in your sandbox following these instructions.
- Choose the WordPress Theme you want to work from in your Appearance screen of your Administration Screen.
- From your initial or test WordPress site, view one of the following page views:
- Front Page
- Single Post
- Mult-Post Page
- From your browser:
- Choose File > Save As.
- Name the saved page with one of the above “titles.”
- Save each page’s file to your sandbox folder.
- From your Theme’s folder, copy the style.css style sheet file to your sandbox folder.
- Open each of the three files you have saved in a text editor and change the following:
<style type="text/css" media="screen">
@import url('/wp-content/themes/yourtheme/style.css');
</style>
<link rel="stylesheet" type="text/css" media="screen" href="style.css" />
Lastly, find all the image files and graphics associated with the style sheet, like background images, icons, bullets, or others, and copy them to your sandbox folder. Links to these items from within your style sheet should have no folders in their links, or link to a subfolder within your sandbox folder, such as:
header {
  margin:5px;
  padding:10px;
  background:url(images/background.jpg)....
}
To test this, double click on one of the pages in that folder to view it in your browser. If the the styles and graphics are visible, it worked. If not, check the link to your style sheet.
Now, you have a sandbox to play in.
To use your sandbox, have two programs open. One is your text editor with the style.css file and the other is your browser with the page you are working on in view. Make a change in your style sheet, save it, then do a total refresh or your browser screen and look at what changes. Then repeat the process. When you are done with one page, go to the next page and check those changes and add more if necessary.
Sandbox Tips
Here are a few tips for playing in your sandbox.
Backup Frequently
As you work, copy the files in the folder before making major renovations to a backup folder. Or you can use a file compression utility like a zip program to save the entire folder. If the changes you make do not work, you have recent backups to work from.
Trace DIVS and CLASSES
Before you begin, go through the source code file of each of the three page views in your text editor and add a comment as to where each division begins and ends. These often cross lines between template files and can be difficult to trace. Make your life easier by documenting where these begin and end.
Make Notes
Before making a huge change, write down what you are changing. This way you have notes to refer to when things do not work later and you are trying to trace the history of the changes.
Make Notes Inside
When making significant changes to the style sheet or to the web page source code, add notes or comments to the code. This will also help you to keep track of the changes you’ve made.
Make Small Steps
Making a lot of changes at once makes it harder to find the small change that made things go out of whack. A good approach would be to take small steps and check, then make additional, small modifications and check again.
Avoid Changing the Template Files
Begin by staying with the site architecture and style references already in place. If you will be releasing your Theme to the public, modifications to the template files must be seriously reconsidered and done carefully. If you are rebuilding your site for your private use, then you can make those changes to your HTML saved pages source code, then move those changes into the template files later.
Moving Your Sandbox To Your Theme
When you have made all your changes and are satisfied with the results, it is time to move your sandbox back into your WordPress Theme.
- Upload the style.css style sheet file to your WordPress Theme folder on your site, replacing the old file.
- Upload all graphics and images to the Theme folder or subfolder.
- View your site in your browser. The changes should be immediate.
- If you made changes to the source code of any of the three pages, track those down to their specific template file and make the changes in those template files on your site.
Install another Blog
- Install WordPress again, but in the wp-config.php file, use a different table-prefix.
- In Options > Writing > Update Services, clear the box.
- Tell no one where your blog is located.
If you go to another site from your blog, then your site could be discovered because of the referer in the browser. To prevent this, go to your real blog, then to another site.
This method is useful toward the end of testing as you can ask for people to test using other browsers / screen resolutions.
Hiding Your WordPress Test Area
To hide your WordPress test folder from others, you can use the .htaccess file on an Apache web server. The .htaccess file is a file that stores server directives, instructions which tell the server what to do in specific situations. You could also use the Apache config file (httpd.conf) or other methods, but the .htaccess file can apply only to the folder in which the .htaccess file resides, and all the folders under that one, allowing you to restrict access to a specific folder.
Remember, this will only work on servers that support .htaccess. If you are unsure that your server supports .htaccess, contact your hosting provider. You may or may not be able to do this depending upon the access permissions you have with your host server. You may need their assistance. If you are running your own server, or if your hosting provider is clue-free, consult the AllowOverride documentation.
Using the .htaccess file, you need to provide instructions to tell the server to restrict or deny access to your WordPress test site. In the folder or directory in which WordPress is installed, do the following:
- Using a text editor create a blank text file called
.htaccess. - You need the following information:
-
- The full path of a directory on your site server that is not accessible to the public (like https://example.com/public_html/ is accessible but https://example.com/private/ is not. Use the latter.
-
- The name of the secured area such as “Enter Password” or “Secure Area” (this is not important, just simple).
- In the file type the following, replacing /full/path/of/directory/ and Security Area with the above information:
AuthUserFile /full/path/of/directory/.htpasswd AuthName "Security Area" AuthType Basic require valid-user - Save this .htaccess file and upload it to the directory on your server you want hidden and secured. This would be the installation directory for WordPress such as
/wordpress/orblog. - Using Telnet, cPanel, or another way to access your server’s command panel, go to the directory specified as
AuthUserFile. - Type the following command, where
user_nameis the user name for theaccess:htpasswd -c .htpasswd user_name - When prompted, enter the password, and confirm it.
- Write down your password and user name and keep it in a safe place.
When you are ready to open your site to the public and remove the protection, delete the password and .htaccess files from their locations.
It is highly recommended that you remove the default ping URL to Ping-o-Matic!, otherwise your test posts will ping and your test blog will be made public though not accessible.
Htaccess Resources
Installing WordPress on a Mac
Use these instruction for setting up a local server environment for testing and development on a Mac.
Installing WordPress on Your Windows Desktop
In order for WordPress to work, it must have access to an Apache server, MySQL/MariaDB, and phpMyAdmin. Installing these separately can be painful. Luckily for us, XAMPP installs all of these with one program, allowing you to run WordPress on your computer. There are two versions of the program, Basic and Lite. The Lite version is usually adequate.
- Download and install XAMPP.
- This installs by default into
C:/xamppliteorC:xampp. - Start XAMPP from
c:xamppliteorc:xampp. - You may need to restart your computer to allow apache services to start.
- In your browser, go to http://localhost/xampp.
- In the left column under Tools, click phpMyAdmin.
- Login is admin.
- In Create new database enter wordpress.
- In the next box, select utf8 unicode ci.
- Click Create button.
- Unzip your WordPress download into the
htdocsdirectory– c:xampphtdocs. - From the folder, open
wp-config-sample.phpin a text editor. - The connection details you need are as follows:
// ** MySQL settings ** //
define('DB_NAME', 'wordpress'); // The name of the database
define('DB_USER', 'root'); // Your MySQL username
define('DB_PASSWORD', ''); // ...and password
define('DB_HOST', 'localhost'); // 99% chance you won't need to change this
- Save as
wp-config.php. - Install by going to http://localhost/wordpress/wp-admin/install.php
IMPORTANT: It is possible to use this to actually host your blog if you have a good enough connection. If you want to do this, you MUST increase the security level. This description is NOT SECURE if you allow web access to your blog.
Installing an Existing WordPress Site
With the help of XAMPP, you can install WordPress directly on your computer and play with it to your heart’s content. This way, it is totally isolated from public exposure and all your mistakes are hidden. When you are ready, you can then move it onto your website, ready for all to see.
Requirements
- Access to your server database.
- Ability to download your entire WordPress installation to your computer.
- Basic XAMPP for Windows
- Enough room on your hard drive to accommodate your database, WordPress installation, and XAMPP.
Backup WordPress
Begin by backing up your WordPress site completely, the files and the database. This will ensure that you have a good copy to fall back on, just in case.
A second backup is then required of your database, but it requires you do a little housekeeping.
As the WordPress database normally stands, there are statistics tables which contain a huge amount of data which add to the overall size of the database, and slow down the process of backing up and downloading this backup copy of your database. You do not have to clear these, but it is generally considered a good idea.
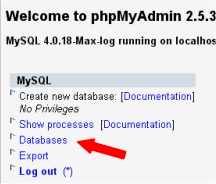
- Login to PHPMyAdmin on your website server.
- From the main login screen, select Databases.
- Choose the name of your WordPress database.
- From the tags at the top of the screen, choose Export.
- In the frame at the top of the Export section you will see a list of tables in your database.
- You will need to choose only those tables that correspond to your WordPress install. They will be the ones with the
table_prefixfound in yourwp-config.phpfile. If you only have WordPress installed, then choose Select All from the left column. - Make sure the SQL button is selected.
- On the right side of the panel, make sure the following boxes are checked.
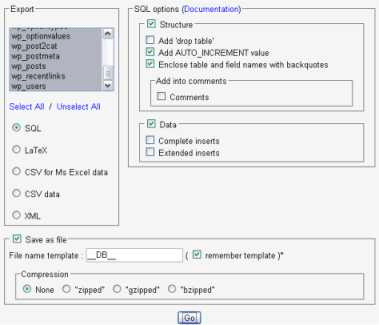
- Structure
- Add AUTO_INCREMENT value
- Enclose table and field names with backquotes
- Data Tick the Save as file option, and leave the template name alone.
- For Compression, select None. Click Go.
- You should be prompted for a file to download. Save the file to your computer. Depending on the database size, this may take a few moments.
Download WordPress
Now, download your entire WordPress site to your computer. This is usually done with an FTP client program. Make sure you include all core WordPress files within your root or WordPress directory, including the index.php.
You should now have in your computer two items:
- One or more database backups.
- All your WordPress files, folders, and images directories.
Copy the backup files again to somewhere safe on your machine so you work on a copy of the backup for the next stage.
Install Basic XAMPP
- Install XAMPP. By default, it will install to
C:xampp. - Go to
C:xamppapacheconfand open the file calledhttpd.confin a text editor. - About line 166 you will find:
#LoadModule rewrite_module modules/mod_rewrite.so. - Remove the # and save the file (this switches
mod_rewriteon). - Create a folder inside
C:xampphtdocs. This will be for WordPress. - Copy all your downloaded WordPress files (not the sql backup) into that directory.
- With a text editor, open the file
wp-config.phpon your WordPress install. - Change the details for your new MySQL connection:
// ** MySQL settings ** //
define('DB_NAME', 'wordpress'); // The name of the new database you made
define('DB_USER', 'root'); // keep this as is
define('DB_PASSWORD', ''); // keep this empty
define('DB_HOST', 'localhost'); // 99% chance you won't need to change this
- Your main
index.phpshould be in the/htdocsfolder or in a subdirectory such as/htdocs/wordpress/. Write that down. - Start XAMPP by clicking the orange
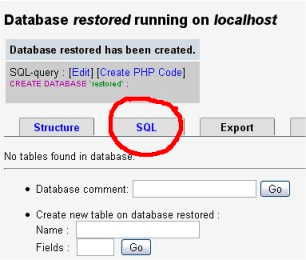
xampp_start.exeor using the console program fromProgram Files ApacheFriendsXAMPPXAMPP Control Panel. - Once it is working, click on link in the left side bar for phpMyAdmin.
- Create a database. The name should match the one used in your
wp-config.phpfile.
Importing Your SQL Backup File
Before you begin to import your SQL backup file, you need to change some information inside your .SQL file.
- Using your text editor, open the
.sqlbackup database file you downloaded. - Find and replace all the instances of your old URL with your new URL. For instance if your blog address is at https://example.com/wordpress/, and your files on your computer are at
/htdocs/wordpress/, replace it with http://127.0.0.1/wordpress/. - Click Save – Do not use Save as.
Now it is time to import your sql file. From within the phpMyAdmin on your computer, click on your database name, then choose the SQL tab. From this screen, click Browse and find your backup files on your computer. Click Go. This can take a few minutes to import.

Once the procedure is complete, your database will be restored and will work just as it did before. If something goes wrong with this last part of the process, it could be that either your backup was corrupted in some way, or something went wrong with the database itself. Keep your backup files safe!
If everything so far has gone well, it is now time to visit your blog! In your browser, type in http://127.0.0.1/wordpress/index.php or the actual name of the folder you created for your WordPress files.
If you get a 404, check you have the right place. You do not need to put htdocs or xampp or anything else after the http://127.0.0.1/ except use your directory name.
WordPress should now function just as it did on the web. You do not need to use the built-in editor in WordPress to alter your files. Just open the files directly in a text editor and edit them as you would any other file. Refreshing your browser’s web page will then show the effects.
Moving Your Test WordPress Site to Your Website
Coming soon – how to move your test site from your computer back live onto your host server site.