块样式设计:利用 CSS 自定义属性赋能用户
Block Supports API 允许你轻松地为区块添加各种选项,包括 color 和 spacing 等样式设置。你只需在 block.json 中进行简单定义即可:
{
  .
  .
  "supports": {
    "color": {},
    "spacing": {
      "margin": true,
      "padding": true
    }
  }
}
当你将这些“supports”属性添加到 block.json 文件后,用户将在设置侧边栏中获得相应的控件,允许他们更改这些设置。
然而,这些 block supports 设置仅适用于区块的根层级——即仅适用于包裹元素。这对于具有单个元素的简单区块(例如单个段落 <p>...</p> 或标题 <h2>...</h2>)来说没问题。
注意: WordPress 6.3 现在包含了 Selectors API,它允许用户将区块支持设置应用于区块的子元素,因此“区块支持仅适用于包裹元素”的说法已不再完全准确。
但如果你的区块具有更复杂的标记结构,由一系列 HTML 元素层级组成呢?
<div class="wp-block-css-demo">
  <header>
    <h2>Mountains</h2>
    <p>We answer all your most frequently asked questions about mountains</p>
  </header>
  <section>
    <details>
      <summary>What is the highest mountain in the world?</summary>
      <div class="answer">
        Mount Everest, in the Himalayas, stands at 8849 meters which makes it the highest mountain in the world.
      </div>
    </details>
    <details>
      <summary>Which is the highest free-standing mountain?</summary>
      <div class="answer">
        Kilimanjaro, a dormant volcano in Tanzania, is the world's highest free-standing mountain at 5895 meters.
      </div>
    </details>
    <details>
      <summary>What is the farthest point from the centre of the Earth?</summary>
      <div class="answer">
        The peak of Mount Chimborazo in Equador is the furthest point from Earth's centre. The summit is 2072 meters farther from Earth's centre than Mount Everest's summit.
      </div>
    </details>
  </section>
</div>
此外,如果你想赋予用户控制这个复杂区块内子元素样式的能力呢?你可能希望让用户能够设置 <header> 元素的样式,或者分别设置 <details> 元素内的 <summary> 和 <div.answer> 元素的样式。
理想情况下,用户应该能够单独设置区块内每个子元素的样式,从而最大限度地控制区块在其网站上的外观。
区块支持无法满足我们此处的需求。需要寻求另一种解决方案。这个方案可能不那么显而易见。
为什么区块中会有复杂标记?
你可能会问,为什么要创建这样的区块?一个复杂的区块可以通过在群组块中组合更原子的块来创建,或者可以将块组合成一个模式。
一个答案是,并非所有你可能想放入群组或模式的内容都作为块存在。以上面的例子为例,虽然 Gutenberg 插件中存在 details/summary 块,但在撰写本文时,它尚未包含在 WordPress 核心中。details/summary 块计划包含在 WordPress 6.3 中,但其样式选项将受到限制。例如,你无法将 <summary> 元素与区块的其余部分分开设置样式。
你的区块中可能存在复杂标记的另一个原因可能是内容是动态生成的。例如,上面示例中每个 <details> 元素中的常见问题解答可能来自自定义文章类型,而不是像图示那样硬编码到标记中。
CSS 自定义属性
因此,一个区块完全有正当理由包含复杂的标记。让用户能够控制具有复杂标记的区块内子元素样式的方法涉及使用CSS 自定义属性(有时也称为 CSS 变量)。
你可能习惯于在样式表的根元素上使用 CSS 自定义属性:
:root {
  --primary-color: midnightblue;
  --secondary-color: seashell;
  --button-border-radius: 12px;
}
这很有意义,因为 DOM 中的所有元素都可以访问这些值。
然而,不一定非要在根层级定义 CSS 自定义属性。CSS 自定义属性可以在特定元素或选择器上定义:
.wp-block-css-demo {
  --header-heading-color: #FFF555;
  --header-bg-color: #537FE8;
}
在这种情况下,它们的作用域限定在该元素,并且这些值对该元素及其子元素可用。但是,DOM 中的任何其他元素都无法访问这些值。
.wp-block-css-demo header {
  background: var(--header-bg-color);
}
.wp-block-css-demo header h2 {
  color: var(--header-heading-color);
}
因此,既然 CSS 自定义属性可以在样式表中的元素上定义,那么它们也可以内联在该元素上:
<div class="wp-block-css-demo" style="--header-heading-color: #FFF555; --header-bg-color: #537FE8;">
  .
  .
</div>
重要的是,这些内联的 CSS 自定义属性仍然可以以完全相同的方式在样式表文件中引用。
在区块的包装元素上内联 CSS 自定义属性,就是你可以让用户控制区块内子元素样式的方法。
让我们看看如何实现这一点。
Edit() 组件
假设在这个例子中,你想让用户能够更改 <header> 元素的背景色和 <header> 元素内 <h2> 元素的文本颜色。
虽然本例中使用了颜色属性,但此处演示的原理适用于任何 CSS 属性,例如边框属性(如宽度和半径)、间距属性(如边距和内边距),甚至变换属性(如旋转和缩放)。
再假设上面的标记是你的区块生成的。你的 Edit() 组件可能看起来像这样:
export default function Edit() {
  return (
    <div { ...useBlockProps() }>
      <header>
        <h2>Mountains</h2>
        <p>We answer all your most frequently asked questions about mountains</p>
      </header>
      <section>
        <details>
          <summary>What is the highest mountain in the world?</summary>
          <div class="answer">
            Mount Everest, in the Himalayas, stands at 8849 meters which makes it the highest mountain in the world.
          </div>
        </details>
        <details>
          <summary>Which is the highest free-standing mountain?</summary>
          <div class="answer">
            Kilimanjaro, a dormant volcano in Tanzania, is the world's highest free-standing mountain at 5895 meters.
          </div>
        </details>
        <details>
          <summary>What is the farthest point from the centre of the Earth?</summary>
          <div class="answer">
            The peak of Mount Chimborazo in Equador is the furthest point from Earth's centre. The summit is 2072 meters farther from Earth's centre than Mount Everest's summit.
          </div>
        </details>
      </section>
    </div>
  );
}
实际上,每个常见问题解答可能来自自定义文章类型并以编程方式渲染,但这种硬编码的标记足以说明原理。
首先,你需要在 block.json 文件中添加几个属性:
{
  .
  .
  "attributes": {
    "headerBackgroundColor": {
      "type": "string",
      "default": "#537FE8"
    },
    "headerHeadingColor": {
      "type": "string",
      "default": "#FFF555"
    }
  }
}
你可以选择提供一些默认值。事实上,这是一个好主意,这样即使用户不更改任何设置,或者用户选择不更改任何内容,也会有一些默认样式。
你可以通过解构传递给组件的对象中的属性,将它们引入你的 Edit() 组件:
export default function Edit( { attributes } ) {
  .
  .
}
现在创建一个对象。该对象中的属性将具有你想要使用的 CSS 自定义属性的名称,其值取自相应的区块属性:
const styles = {
  "--header-bg-color": attributes.headerBackgroundColor,
  "--header-heading-color": attributes.headerHeadingColor,
};
注意: 关于为 CSS 自定义属性选择合适名称的指导,请参阅下面关于主题兼容性的部分。
现在是魔法时刻 🪄。将你刚刚创建的对象作为 style 属性的值,该属性位于一个对象中,然后该对象被传递给区块包装元素上的 useBlockProps 钩子:
<div { ...useBlockProps( { style: styles } ) }>
  .
  .
</div>连同类和区块支持属性,useBlockProps 会将传递给它的对象内容展开到在编辑器中渲染时的包装元素上。
因此,包装 <div> 将获得一个带有内联样式的 style 属性,而构成该属性内容的内联样式将是两个 CSS 自定义属性,其值来自区块属性:
然后,这些内联的 CSS 自定义属性可以从区块的样式表中引用(注意这是需要编译步骤的 SCSS):
.wp-block-create-block-css-demo {
.
.
& header {
background-color: var(--header-bg-color);
}
& header h2 {
color: var(--header-heading-color);
}
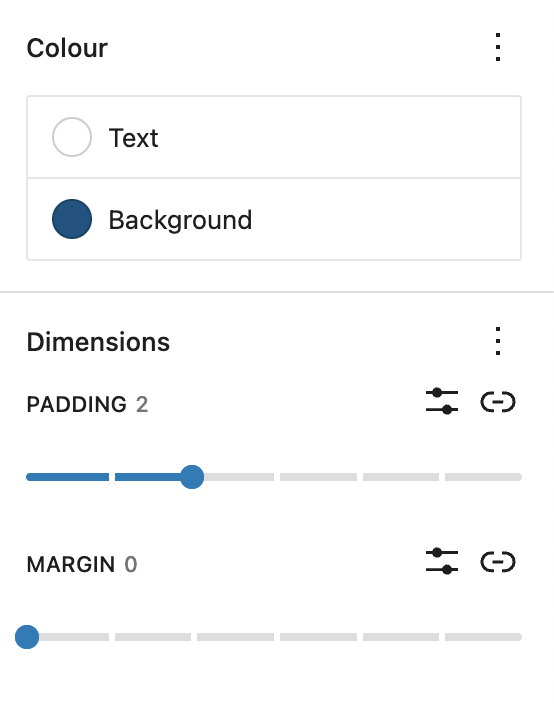
}添加控件
现在我们需要给用户一些控件,以便他们可以更改存储在属性中的值。你提供的控件取决于你希望用户能够更改的属性类型,但由于本例中使用了颜色,这里你需要的是 <PanelColorSettings> 组件。
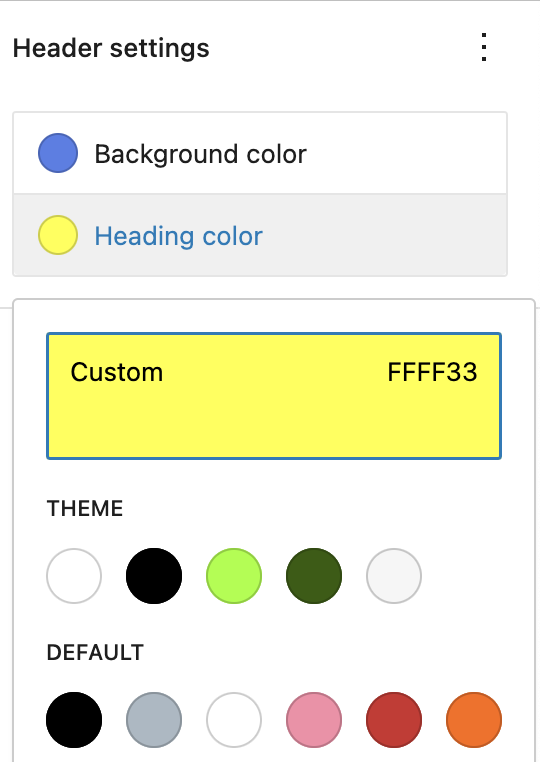
首先从 @wordpress/block-editor 导入 PanelColorSettings 和 InspectorControls,然后在 Edit() 组件返回的 JSX 中,将 <PanelColorSettings> 组件添加到 <InspectorControls> 组件内:
<InspectorControls>
  <PanelColorSettings
    title={ __( 'Header settings' ) }
    colorSettings={ [
      {
        value: attributes.headerBackgroundColor,
        onChange: onChangeHeaderBackgroundColor,
        label: __( Background color ' ),
      },
      {
        value: attributes.headerHeadingColor,
        onChange: onChangeHeaderHeadingColor,
        label: __( 'Heading color' ),
      },
    ] }
  />
</InspectorControls>
然后,每当区块重新渲染时,它将获取用户使用这些控件在属性中定义的颜色,这些值将被分配给内联在区块包装元素上的 CSS 自定义属性。
记住要解构 setAttributes 并创建 onChange 函数,你的 Edit() 组件应该如下所示:
import { __ } from '@wordpress/i18n';
import {
  useBlockProps,
  InspectorControls,
  PanelColorSettings,
} from '@wordpress/block-editor';
import './editor.scss';

export default function Edit( { attributes, setAttributes } ) {

  // destructure the attributes
  const {
    headerBackgroundColor,
    headerHeadingColor
  } = attributes;

  // define the styles object
  const styles = {
    "--header-bg-color": headerBackgroundColor,
    "--header-heading-color": headerHeadingColor,
  };

  // define the onChange functions
  const onChangeHeaderBackgroundColor = ( val ) => {
    setAttributes( { headerBackgroundColor: val } );
  };
  const onChangeHeaderHeadingColor = ( val ) => {
    setAttributes( { headerHeadingColor: val } );
  };

  return (
    <>
      <InspectorControls>
        <PanelColorSettings
          title={ __( 'Header settings' ) }
          colorSettings={ [
            {
              value: headerBackgroundColor,
              onChange: onChangeHeaderBackgroundColor,
              label: __( 'Background color' ),
            },
            {
              value: headerHeadingColor,
              onChange: onChangeHeaderHeadingColor,
              label: __( 'Heading color' ),
            },
          ] }
        />
      </InspectorControls>
      <div { ...useBlockProps( { style: styles } ) }>
        <header>
          <h2>Mountains</h2>
          <p>We answer all your most frequently asked questions about mountains</p>
        </header>
        <section>
          <details>
            <summary>What is the highest mountain in the world?</summary>
            <div class="answer">
              Mount Everest, in the Himalayas, stands at 8849 meters which makes it the highest mountain in the world.
            </div>
          </details>
          <details>
            <summary>Which is the highest free-standing mountain?</summary>
            <div class="answer">
              Kilimanjaro, a dormant volcano in Tanzania, is the world's highest free-standing mountain at 5895 meters.
            </div>
          </details>
          <details>
            <summary>What is the farthest point from the centre of the Earth?</summary>
            <div class="answer">
              The peak of Mount Chimborazo in Equador is the furthest point from Earth's centre. The summit is 2072 meters farther from Earth's centre than Mount Everest's summit.
            </div>
          </details>
        </section>
      </div>
    </>
  );
}
save() 函数
如果你正在创建一个静态区块,那么在你的 save() 函数中做完全相同的事情——当然,除了 <InspectorControls> 控件和 onChange 函数。你的 save() 函数应该如下所示(注意,为简洁起见,已删除部分标记):
import { useBlockProps } from "@wordpress/block-editor";

export default function save( { attributes } ) {

  // destructure the attributes
  const {
    headerBackgroundColor,
    headerHeadingColor
  } = attributes;

  // define the styles object
  const styles = {
    "--header-bg-color": headerBackgroundColor,
    "--header-heading-color": headerHeadingColor,
  };

  return (
    <>
      <div {...useBlockProps.save( { style: styles } ) }>
        <header>
          // header content
        </header>
        <section>
          // section content - <details> elements go here
        </section>
      </div>
    </>
  );
}
动态区块
如果你正在创建一个动态区块,那么情况有些类似,但也有些不同。让我们深入探讨一下如何实现同样的事情,即为包装元素添加一个 style 属性,其值为我们的 CSS 自定义属性,但这是在动态区块中。
对于动态区块,在编辑器中渲染的 Edit() 组件与上面概述的完全相同。但动态区块没有 save() 函数,因为它是服务器端渲染的。相反,它要么有一个 render() 函数,要么(更近期的做法)在 block.json 的 render 属性中定义一个渲染文件:
{
  .
  .
  render: "file:./render.php",
  .
  .
}
采用这种更现代的方式意味着你不需要将属性传递给函数。渲染文件会自动以关联数组的形式接收属性作为 $attributes。
回想一下,之前我们将样式作为对象传递给 useBlockProps 钩子,然后 useBlockProps 将其展开到包装元素上。在动态区块的 PHP 中,原理类似,但我们不是传递一个对象,而是传递一个字符串给 get_block_wrapper_attributes,该字符串需要被 echo 到包装元素上。
我们可以像这样构造字符串:
$styles = "--header-bg-color: " . $attributes[ "headerBackgroundColor" ] . ";";
$styles .= "--header-heading-color: " . $attributes[ "headerHeadingColor" ];
然后将其用作关联数组中 style 属性的值,该数组被传递给 get_block_wrapper_attributes:
<div <?php echo get_block_wrapper_attributes( array( "style" => $styles ) ); ?>>
  .
  .
</div>
因此,原理相同,过程类似,但在创建动态区块时,你应该注意一些关键差异。
你的 render.php 文件应该如下所示:
render.php<?php
  $styles = "--header-bg-color: " . $attributes[ "headerBackgroundColor" ] . ";";
  $styles .= "--header-heading-color: " . $attributes[ "headerHeadingColor" ];
?>

<div <?php echo get_block_wrapper_attributes( array( "style" => $styles ) ); ?>>
  <header>
    <h2>Mountains</h2>
    <p>
      We answer all your most frequently asked questions about mountains
    </p>
  </header>
  <section>
    <details>
      <summary>What is the highest mountain in the world?</summary>
      <div class="answer">
        Mount Everest, in the Himalayas, stands at 8849 meters which makes it the highest mountain in the world.
      </div>
    </details>
    <details>
      <summary>Which is the highest free-standing mountain?</summary>
      <div class="answer">
        Kilimanjaro, a dormant volcano in Tanzania, is the world's highest free-standing mountain at 5895 meters.
      </div>
    </details>
    <details>
      <summary>
        What is the farthest point from the centre of the Earth?
      </summary>
      <div class="answer">
        The peak of Mount Chimborazo in Equador is the furthest point from Earth's centre. The summit is 2072 meters farther from Earth's centre than Mount Everest's summit.
      </div>
    </details>
  </section>
</div>
当这些代码在前端渲染时,它使用了完全相同的CSS文件,引用了现在内嵌在包装元素上的CSS自定义属性,所以内容看起来和之前用静态块时完全一样。
关于主题兼容性的说明
之前你设置了属性的默认值。但你也要注意,主题作者可能还想在他们的主题文件中设置默认值。theme.json
为了让主题作者能够为复杂模块中的子元素设置默认值,需要考虑 CSS 自定义属性的命名。
应遵循特定的格式。具体情况是:
--wp--custom--{namespace}--{attributeName}名称的每个部分都用双划线分隔。假设我们的命名空间为 ,之前使用的两个 CSS 自定义属性名称的格式应为:--css-demo
--wp--custom--css-demo--header-bg-color
--wp--custom--css-demo--header-heading-color
通过这种方式指定你的 CSS 自定义属性名称,主题作者可以通过文件中的 and 属性来提供默认值。settings.custom.cssDemo.headerBgColorsettings.custom.cssDemo.headerHeadingColortheme.json