如何通过 SlotFill 系统扩展 WordPress
自 WordPress 2.0 以来,开发者一直依赖 Hooks API 来扩展 WordPress 的功能,直到 WordPress 5.0,这仍是唯一的方式。
在 WordPress 5.0 中,WordPress SlotFill 系统作为 Gutenberg 项目的一部分被引入,它是一种扩展范式,允许开发者扩展由 Gutenberg 项目引入的 UI,例如文章编辑器和站点编辑器。
从高层次看,SlotFill 系统是一种扩展范式,允许开发者注册包含内容(或称为 Fill)的插件,以在 UI 的特定位置(或称为 Slot)显示。
与 Hooks 相比如何?
历史上,如果开发者想向 WordPress 管理后台添加 UI 元素,通常会有一个暴露的 Action 可以“挂钩”。
例如,如果利用 edit_form_after_title 动作,可以向现有的文章编辑屏幕添加一个副标题:
add_action(
   'edit_form_after_title',
   function() {
       echo '<input type="text" class="widefat" placeholder="Add secondary title" />';
   }
);
显示效果如下:

之所以可能,是因为在加载以渲染文章编辑屏幕的文件中,通过在特定位置调用 do_action() 暴露了该动作。
do_action( 'edit_form_after_title', $post );基于此,一个 Action 可以看作有三个步骤:
- WordPress 核心通过
do_action()调用暴露一个扩展位置。 - 开发者创建一个包含相应
add_action()调用的插件(或主题)。 - WordPress 加载页面,当
do_action运行时,插件中的自定义代码在do_action被调用的位置运行。
SlotFill 与动作类似,因为它们也是基于位置的。实际实现有很大不同,但步骤在概念上非常相似:
- 在 WordPress 核心的某个地方暴露一个 Slot。
- 开发者使用
wp.plugins.registerPlugin()注册一个插件,该插件包含对应 Slot 的 Fill。 - WordPress 加载暴露 Slot 的页面,SlotFill 系统在 Slot 位置渲染 Fill 内容。
拼图的各个部分
SlotFill 系统由五个部分协同工作,以在 Slot 位置渲染 Fill 内容:
- Slot 组件
- Fill 组件
- SlotFillProvider 组件
- registerPlugin()
- PluginArea 组件。
Slot
Slot 组件用于确定 UI 中扩展点的暴露位置。无论此组件在哪里渲染,关联的 Fill 组件内容都将显示在那里。
Slot 接受以下属性:
- name: Slot 的名称。
- fillProps: 传递给 Fill 的对象。
- bubblesVirtually: 更改事件冒泡行为。
import { Slot } from '@wordpress/components';
<Slot
    name="my-slot-name"
    fillProps={ { key: 'value' } }
    bubblesVirtually
/>
Fill
Fill 组件用于向具有相同 name 属性的 Slot 提供内容。
此组件可以在 UI 内的任何地方渲染——甚至可以在完全不同的元素树中。Fill 的内容将在具有相同 name 属性的 Slot 中渲染,无论 Fill 在哪里渲染。
Fill 接受单个属性:
- name: 此 Fill 目标 Slot 的名称。
import { Fill } from '@wordpress/components';

<Fill name="my-slot-name">
    Fill Contents
</Fill>
SlotFillProvider
SlotFillProvider 组件是将 Fill 连接到其 Slot 的神奇粘合剂。
它包装 UI,其工作是检测其内部或其任何子组件中的任何 Slot 或 Fill,然后在关联的 Slot 位置渲染 Fill 内容。此组件不接受任何属性。
registerPlugin()
列表中唯一不是 React 组件的项目,此函数用于注册包含一个或多个 Fill 的插件。它是 @wordpress/plugins 包的一部分,接受两个参数:
- name: 标识插件的字符串。
- settings: 包含插件设置的对象。
- render: 要渲染的组件。
- icon: 与插件关联的视觉资源。
- scope: 此插件所属的作用域。这仅用于自定义实现,应保持未定义。
有关 registerPlugin 和此包提供的其他函数的更多信息,请参阅插件模块的官方文档。
import { registerPlugin } from '@wordpress/plugins';

registerPlugin( 'example-plugin', {
    render: ComponentToRender,
    icon: 'smiley',
} );
PluginArea
最后是 PluginArea 组件。它的工作是从插件 API 检索所有已注册的插件,并在隐藏的 div 元素内部渲染它们。
PluginArea 组件接受以下属性:
- scope: 插件区域的作用域。已注册的插件必须匹配作用域才能被渲染。目前在现有实现中未定义。
- onError: 处理错误的函数。
import { PluginArea } from '@wordpress/plugins';

<PluginArea
    scope="custom-scope"
    onError={ onErrorHandler }
/>;
组合起来
文章编辑器和站点编辑器屏幕都实现了 SlotFill 系统。从高层次看,它看起来像这样:
- 一个
SlotFillProvider包装EditorProvider组件。 - 各种
Slot组件在 Layout 组件中暴露。 - 使用
registerPlugin()函数添加Fill组件。 Fill组件由PluginArea组件在隐藏的 div 中渲染。Fill内容在关联的Slot位置渲染。
// Pseudo code for edit-post
<SlotFillProvider>
    <EditorProvider>
        <Layout>
            { /* Slots are exposed in various locations */ }
            <PluginArea />
        </Layout>
    </EditorProvider>
</SlotFillProvider>;
视觉表示
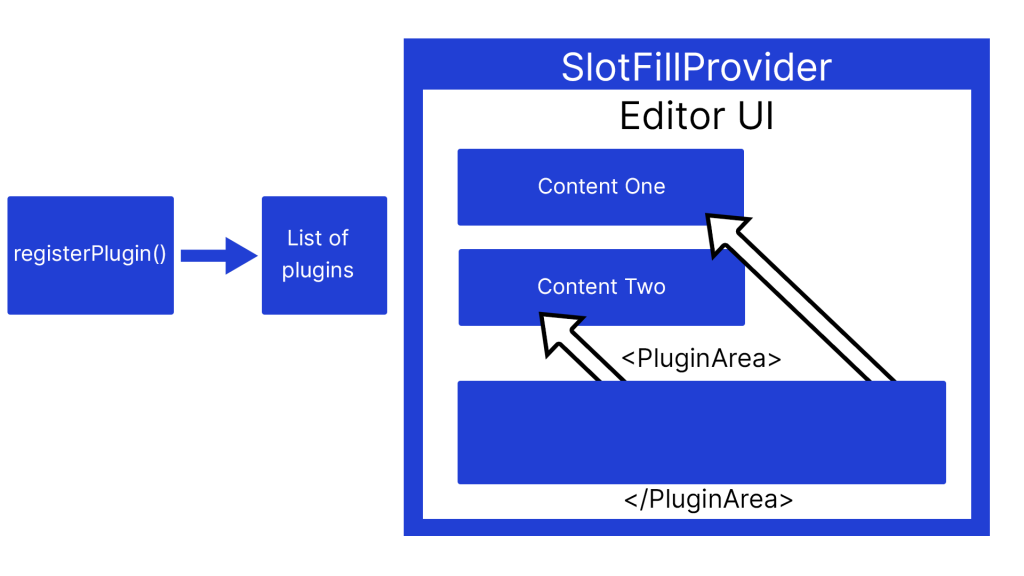
在下面的视觉表示中,可以看到系统如何协同工作。插件使用 registerPlugin() 注册,并添加到已注册插件列表中。PluginArea 组件检索插件,并将每个包含 Fill 组件的插件的 render 属性渲染到一个隐藏的 div 中。

一旦 PluginArea 渲染了插件,SlotFillProvider 就会检测到有可用的 Fill,并在关联的 Slot 位置渲染它们的内容。
SlotFill 的构建方式
到目前为止,本文中的示例都集中在基本的 Slot 组件上。
然而,可用的 SlotFill 不仅仅是简单的组件。它们是命名组件,通常包含其他功能和内部组件。
在此示例中,您可以查看 PluginPostStatusInfo SlotFill 的结构。
const PluginPostStatusInfo = ( { children, className } ) => (
    <Fill>
        <PanelRow className={ className }>{ children }</PanelRow>
    </Fill>
);

PluginPostStatusInfo.Slot = Slot;

export default PluginPostStatusInfo;
请注意,导出的 SlotFill 组件同时包含 Slot 和 Fill。因此得名!
暴露一个 Slot
每个 SlotFill 都使用其点号 Slot 属性在 UI 中暴露。
在这个简化示例中,我们看到 PluginPostStatusInfo Slot 如何在 PostStatus 组件内部暴露。完整源代码可在 GitHub 上的 WordPress Gutenberg 仓库中找到。
function PostStatus( { isOpened, onTogglePanel } ) {
    return (
        <PanelBody
            className="edit-post-post-status"
            title={ __( 'Summary' ) }
            opened={ isOpened }
            onToggle={ onTogglePanel }
        >
            <PluginPostStatusInfo.Slot/>
        </PanelBody>
    );
}
注册一个 Fill
现在 Slot 已经暴露,我们可以使用 registerPlugin 来添加一个 Fill。
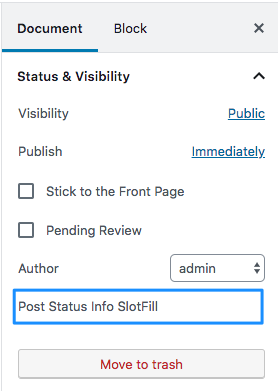
在下面的示例中,PluginPostStatusInfo SlotFill 从 wordpress/edit-post 包导入,并在我们的 render 属性中使用。
import { registerPlugin } from '@wordpress/plugins';
import { PluginPostStatusInfo } from '@wordpress/edit-post';

registerPlugin('example-plugin', {
    render: () => (
        <PluginPostStatusInfo>
            <p>Post Status info SlotFill</p>
        </PluginPostStatusInfo>
    ),
    icon: 'smiley'
})
PluginPostStatusInfo 组件的任何子元素都将在关联的 Slot 位置渲染。
当前可用的 SlotFill
截至 WordPress 6.1,总共有 12 个可用的 Slot,其中 9 个在文章编辑屏幕,3 个在站点编辑器屏幕。这些在区块编辑器手册中有详细记录并包含示例。
文章编辑屏幕
- PluginPostStatusInfo
- PluginPrePublishPanel
- PluginPostPublishPanel
- PluginMoreMenuItem
- PluginBlockSettingsMenuItem
- PluginSidebar
- PluginSidebarMoreMenuItem
- PluginDocumentSettingPanel
- MainDashboardButton
这些 Slot 是 <a href="https://developer.wordpress.org/block-editor/reference-guides/packages/packages-edit-post/">@wordpress/edit-post</a> 包的一部分。
import {
    PluginPostStatusInfo
    PluginPrePublishPanel
    PluginPostPublishPanel
    PluginMoreMenuItem
    PluginBlockSettingsMenuItem
    PluginSidebar
    PluginSidebarMoreMenuItem
    PluginDocumentSettingPanel
    __experimentalMainDashboardButton as MainDashboardButton,
} from '@wordpress/edit-post';
站点编辑器屏幕
这些 Slot 是 @wordpress/edit-site 包的一部分。这些 Slot 链接到与文章编辑屏幕中对应项相同的文档。区别在于 Slot 暴露的位置。
import {
    PluginMoreMenuItem,
    PluginSidebar,
    __experimentalMainDashboardButton as MainDashboardButton,
} from '@wordpress/edit-site';
了解更多资源
- 区块编辑器手册中的 SlotFills 参考(文档)
- 演讲 – 为 Gutenberg 创建预发布清单 (WordPress.tv 2022)
- 闪电演讲 – 使用 SlotFill 扩展 Gutenberg (WordPress.tv 2022)
- SlotFill 示例仓库(外部)