使用客户端过滤器定制编辑器体验
随着每个新 WordPress 版本的发布,编辑器的设计工具为用户提供了更多的功能和灵活性,增加了更多让内容真正属于用户自己的方式。但这种能力可能使得网站在视觉上保持品牌一致性,并遵循组织的内容准则变得困难。参与网站工作的人越多,这项任务就越艰巨。
这就是为什么在 WordPress 不断扩展用户选项的同时,该项目也一直在积极引入定制编辑器体验的方法。这有助于确保编辑器的使用方式与网站所有者的目标和目的保持一致。一些行业将这些定制技术称为“治理”。
如今,得益于 WordPress 6.2 引入的一个新的客户端过滤器,管理网站内容变得更加容易。它被称为 blockEditor.useSetting.before 过滤器,它为您提供了一种前所未有的定制能力。
本文将引导您了解细节并探索这些新功能。
开始使用客户端过滤器
blockEditor.useSetting.before 过滤器是一个客户端 JavaScript 过滤器,允许您在编辑器渲染之前设置块级的 theme.json 设置。并且,由于它在客户端运行,您比使用 服务器端 PHP 过滤器拥有更多的控制权。例如,您可以轻松地根据块与其他块的关系来修改设置。
首先,从 @wordpress/hooks 包中导入 addFilter。该函数的语法如下所示:
import { addFilter } from '@wordpress/hooks';

addFilter( 'hookName', 'namespace', callback, priority );
WordPress 中的 JavaScript 过滤器看起来和工作方式很像 PHP 过滤器,但它们确实需要一个命名空间作为第二个参数。命名空间唯一标识回调函数,可以是您想要的任何内容。优先级是可选的,因此为了简单起见,本文将忽略它。
blockEditor.useSetting.before 过滤器的回调函数接受四个参数。
settingValue– 正在过滤的块设置的当前值。settingName– 要修改的块设置的名称。clientId– 块的唯一标识符。blockName– 块类型的名称。
以下是一个如何将 Column 块的间距单位限制为仅像素的示例。过滤 spacing.units 设置,回调函数检查 blockName 参数以查看当前块是否为 Column。如果是,函数返回一个 [ 'px' ] 数组。如果不是,则返回当前的 settingValue。
import { addFilter } from '@wordpress/hooks';

function restrictColumnSpacingSettings(
    settingValue,
    settingName,
    clientId,
    blockName
) {
    if (
        blockName === 'core/column' &&
        settingName === 'spacing.units'
    ) {
        return [ 'px' ];
    }

    return settingValue;
}

addFilter(
    'blockEditor.useSetting.before',
    'block-curation-examples/useSetting.before/column-spacing',
    restrictColumnSpacingSettings
);
虽然您可以使用 服务器端 theme.json 过滤器或在主题的 theme.json 文件中直接进行此简单更改,但 blockEditor.useSetting.before 过滤器是独一无二的,因为它允许您以许多其他方式修改设置:根据块的位置、相邻块、当前用户的角色等等。
使用此过滤器时,请记住以下两点:
- 您只能修改 theme.json 可以定义的 块设置。
- 过滤器不会生成新的 CSS 变量。
过滤器不能直接更改块属性——只能更改您可以在 theme.json 中在块级别定义的块设置。许多核心块和大多数自定义块包含您无法在 theme.json 中配置的设置,这意味着您无法使用 blockEditor.useSetting.before 过滤器更改它们。
当您在 theme.json 中定义颜色、字体大小、间距等时,实际上是在创建 CSS 变量,然后使用这些变量来应用这些设置。同样,blockEditor.useSetting.before 过滤器不会生成新的 CSS 变量。因此,如果您使用过滤器为块定义调色板,则只有在 theme.json 中已定义这些颜色时,颜色才会起作用。可以将 theme.json 视为所有块设置的来源。
但即使有这些限制,这个客户端过滤器的功能和灵活性也确实令人印象深刻。让我们看几个更高级的示例。
根据块属性限制设置
假设您想根据标题块的级别来限制其排版设置。例如,您可能授予 H1 和 H2 完全访问所有排版设置的权限,但将 H3 到 H6 限制为仅三种字体大小并禁用所有其他设置。您无法在 theme.json 中做到这一点。但使用 blockEditor.useSetting.before 过滤器就很简单。
标题块的级别保存为名为 level 的属性。因此,您可以在过滤排版设置的过程中添加对当前标题级别的检查。如果 level 大于或等于 3,则相应地修改每个 settingValue。
在了解如何添加标题级别检查之前,让我们回顾一下在所有标题块中禁用排版设置(除了三种预定义字体大小)的初始设置。请记住,下面的示例假设使用 Twenty Twenty-Three 主题,其中字体大小已在 theme.json 中定义。
import { addFilter } from '@wordpress/hooks';

function restrictHeadingTypographySettings(
    settingValue,
    settingName,
    clientId,
    blockName
) {
    if ( blockName === 'core/heading' ) {
        // 修改这些块设置。
        const modifiedBlockSettings = {
            'typography.customFontSize': false,
            'typography.fontStyle': false,
            'typography.fontWeight': false,
            'typography.letterSpacing': false,
            'typography.lineHeight': false,
            'typography.textDecoration': false,
            'typography.textTransform': false,
            'typography.fontSizes': [
                {
                    fluid: {
                        min: '1rem',
                        max: '1.125rem',
	            },
                    size: '1.125rem',
                    slug: 'medium',
                },
                {
                    fluid: {
                        min: '1.75rem',
                        max: '1.875rem',
                    },
                    size: '1.75rem',
                    slug: 'large',
                },
                {
                    fluid: false,
                    size: '2.25rem',
                    slug: 'x-large',
                },
            ],
        };

        if ( modifiedBlockSettings.hasOwnProperty( settingName ) ) {
            return modifiedBlockSettings[ settingName ];
        }
    }

    return settingValue;
}

addFilter(
    'blockEditor.useSetting.before',
    'block-curation-examples/useSetting.before/heading-typography',
    restrictHeadingTypographySettings
);
您可以通过多种方式设计回调函数。我选择创建一个将设置名称映射到修改值的对象。这样,当过滤一个值时,回调函数会检查该值的 settingName 是否在对象中。如果是,则返回修改后的值。
要将这些修改限制在 H3 到 H6 级别,您需要使用 getBlockAttributes 获取块的当前 level 属性,该函数可从 @wordpress/block-editor 包中获得。该选择器接受块的唯一客户端 ID 作为单个参数,该参数已作为 clientId 提供给回调函数。
这是一个简化的代码片段,展示了如何使用 select 从 'core/block-editor' 存储中返回 getBlockAttributes 选择器,然后使用它来检索所选块的 level 属性。
import { select } from '@wordpress/data';

const { getBlockAttributes } = select( 'core/block-editor' );

// 根据其客户端 ID 确定块的级别。
const headingLevel = getBlockAttributes( clientId )?.level ?? 0;
headingLevel 常量看起来很复杂,但它检索块属性对象并检查 level 属性是否存在。如果存在,则返回当前值。否则,返回 0。?? 被称为 空值合并运算符。
将所有内容放在一起,完整的过滤器应如下所示:
import { select } from '@wordpress/data';
import { addFilter } from '@wordpress/hooks';

function restrictHeadingTypographySettings(
    settingValue,
    settingName,
    clientId,
    blockName
) {
    if ( blockName === 'core/heading' ) {
        const { getBlockAttributes } = select( 'core/block-editor' );

        // 确定 'core/heading' 块的级别。
        const headingLevel = getBlockAttributes( clientId )?.level ?? 0;
        // 修改这些块设置。
        const modifiedBlockSettings = {
            'typography.customFontSize': false,
            'typography.fontStyle': false,
            'typography.fontWeight': false,
            'typography.letterSpacing': false,
            'typography.lineHeight': false,
            'typography.textDecoration': false,
            'typography.textTransform': false,
            'typography.fontSizes': [
                {
                    fluid: {
                        min: '1rem',
                        max: '1.125rem',
	            },
                    size: '1.125rem',
                    slug: 'medium',
                },
                {
                    fluid: {
                        min: '1.75rem',
                        max: '1.875rem',
                    },
                    size: '1.75rem',
                    slug: 'large',
                },
                {
                    fluid: false,
                    size: '2.25rem',
                    slug: 'x-large',
                },
            ],
        };

        // 仅对 H3-H6 应用设置修改。
        if (
            headingLevel >= 3 &&
            modifiedBlockSettings.hasOwnProperty( settingName )
        ) {
            return modifiedBlockSettings[ settingName ];
        }
    }

    return settingValue;
}

addFilter(
    'blockEditor.useSetting.before',
    'block-curation-examples/useSetting.before/heading-typography',
    restrictHeadingTypographySettings
);
在编辑器中,可用的排版设置将根据标题块的级别自动调整。
虽然此示例可能与您的编辑器定制需求无关,但它暗示了 blockEditor.useSetting.before 过滤器的潜力。
接下来,让我们考虑用户权限和基于文章类型的条件设置。
根据用户权限和文章类型限制设置
虽然编辑器为用户提供了无与伦比的块设计控制水平,但这种自由程度并不总是一件好事——尤其是当您的网站有很多具有广泛角色的用户时。管理员可能需要访问所有设计工具,但内容创作者可能不需要。
在 theme.json 中,您可以全局或在块级别限制设置。这对于在整个站点禁用特定功能非常有用。但对于这些限制的用户级管理系统,您需要寻找其他方法。有 theme.json 的 服务器端 PHP 过滤器可用,但这超出了本文的范围。
目前,您可能希望为除管理员之外的所有人禁用边框设置,并且仅针对文章。当用户编辑页面或其他自定义文章类型时,边框设置应保持对所有用户启用。
您可以使用 blockEditor.useSetting.before 过滤器以及两个附加工具来完成此操作。@wordpress/data 包中的 canUser 选择器允许您处理权限,而 @wordpress/editor 包为您提供了一个方便的 getCurrentPostType 选择器。
和之前一样,这里有一个简化的代码片段,展示了 select 如何检索这两个选择器。此代码允许您识别当前文章类型,并查看当前用户是否可以更新设置(表示管理员权限)。
import { select } from '@wordpress/data';

const { canUser } = select( 'core' );
const { getCurrentPostType } = select( 'core/editor' );

// 检查用户权限并获取当前文章类型。
const canUserUpdateSettings = canUser( 'update', 'settings' );
const currentPostType = getCurrentPostType();
当您结合这些选择器的功能时,很容易使用条件逻辑根据用户角色和正在编辑的文章类型来启用或禁用块设置。
将所有内容放在一起,完整的过滤器应如下所示:
import { select } from '@wordpress/data';
import { addFilter } from '@wordpress/hooks';

function restrictBlockSettingsByUserPermissionsAndPostType(
    settingValue,
    settingName,
    clientId,
    blockName
) {
    const { canUser } = select( 'core' );
    const { getCurrentPostType } = select( 'core/editor' );

    // 检查用户权限并获取当前文章类型。
    const canUserUpdateSettings = canUser( 'update', 'settings' );
    const currentPostType = getCurrentPostType();

    // 在这些文章类型上禁用块设置。
    const disabledPostTypes = [ 'post' ];

    // 禁用这些块设置。
    const disabledBlockSettings = [
        'border.color',
        'border.radius',
        'border.style',
        'border.width',
    ];

    if (
        ! canUserUpdateSettings &&
        disabledPostTypes.includes( currentPostType ) &&
        disabledBlockSettings.includes( settingName )
    ) {
        return false;
    }

    return settingValue;
}

addFilter(
    'blockEditor.useSetting.before',
    'block-curation-examples/useSetting.before/user-permissions-and-post-type',
    restrictBlockSettingsByUserPermissionsAndPostType
);
现在,请注意我在这个回调函数中采用了不同的方法来修改 settingValue。当满足条件时,所有四个边框设置都必须为 false,所以我只需要一个包含每个 settingName 的简单数组。
应用此过滤器后,在编辑器中对于具有不同权限的用户,效果如下所示。
根据块上下文限制设置
正是需要在上下文中定义块设置的需求,部分推动了 blockEditor.useSetting.before 过滤器的开发。考虑以下示例。
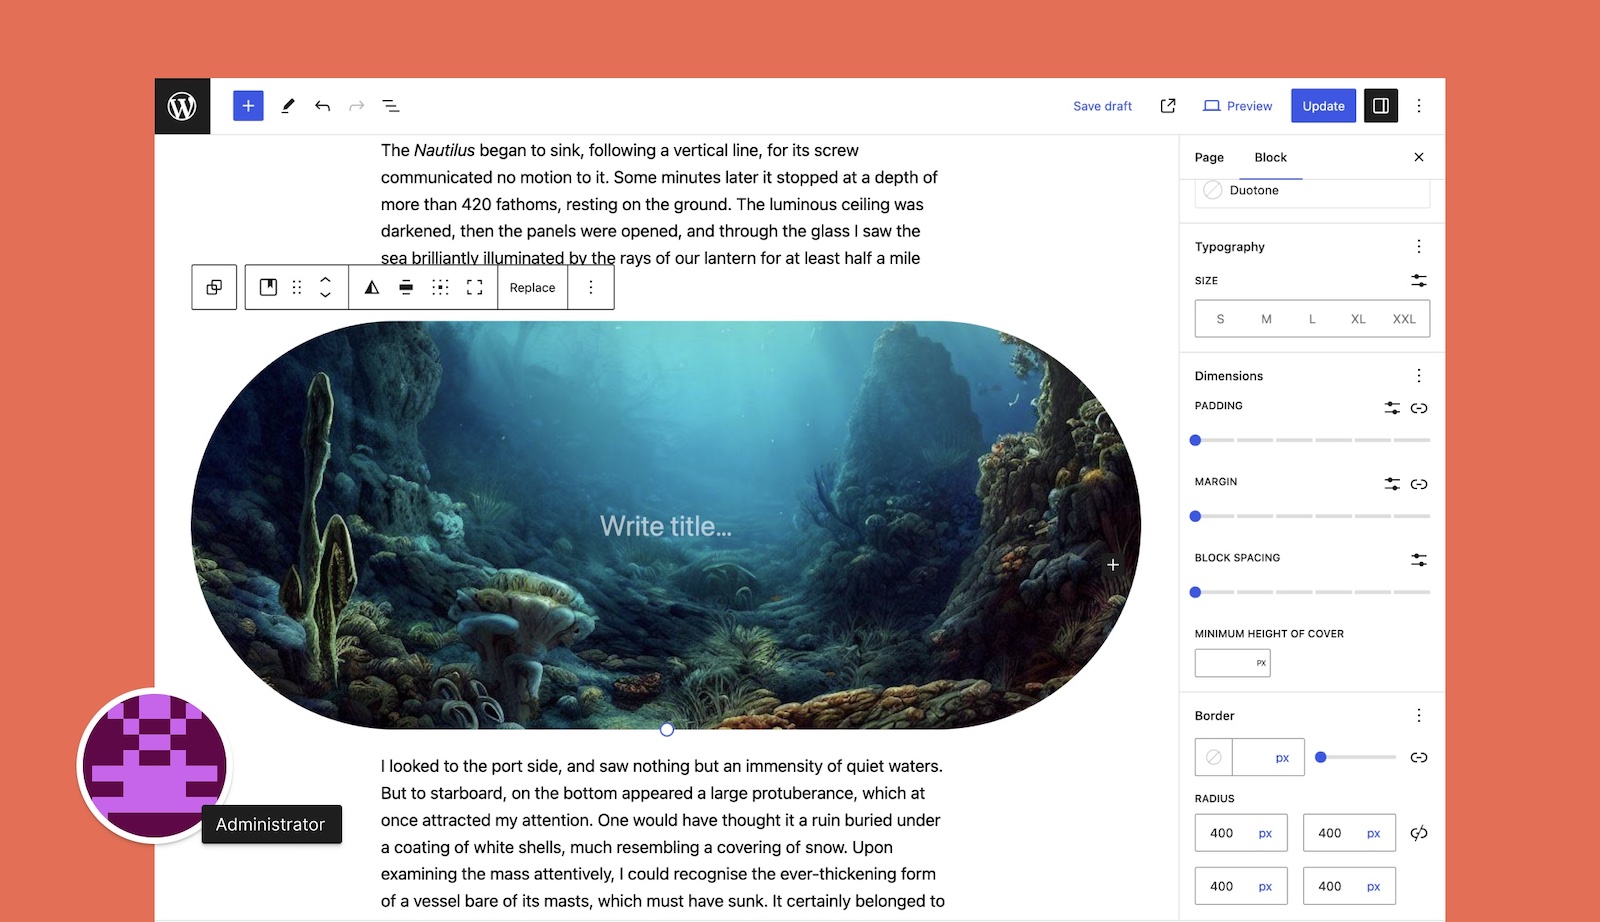
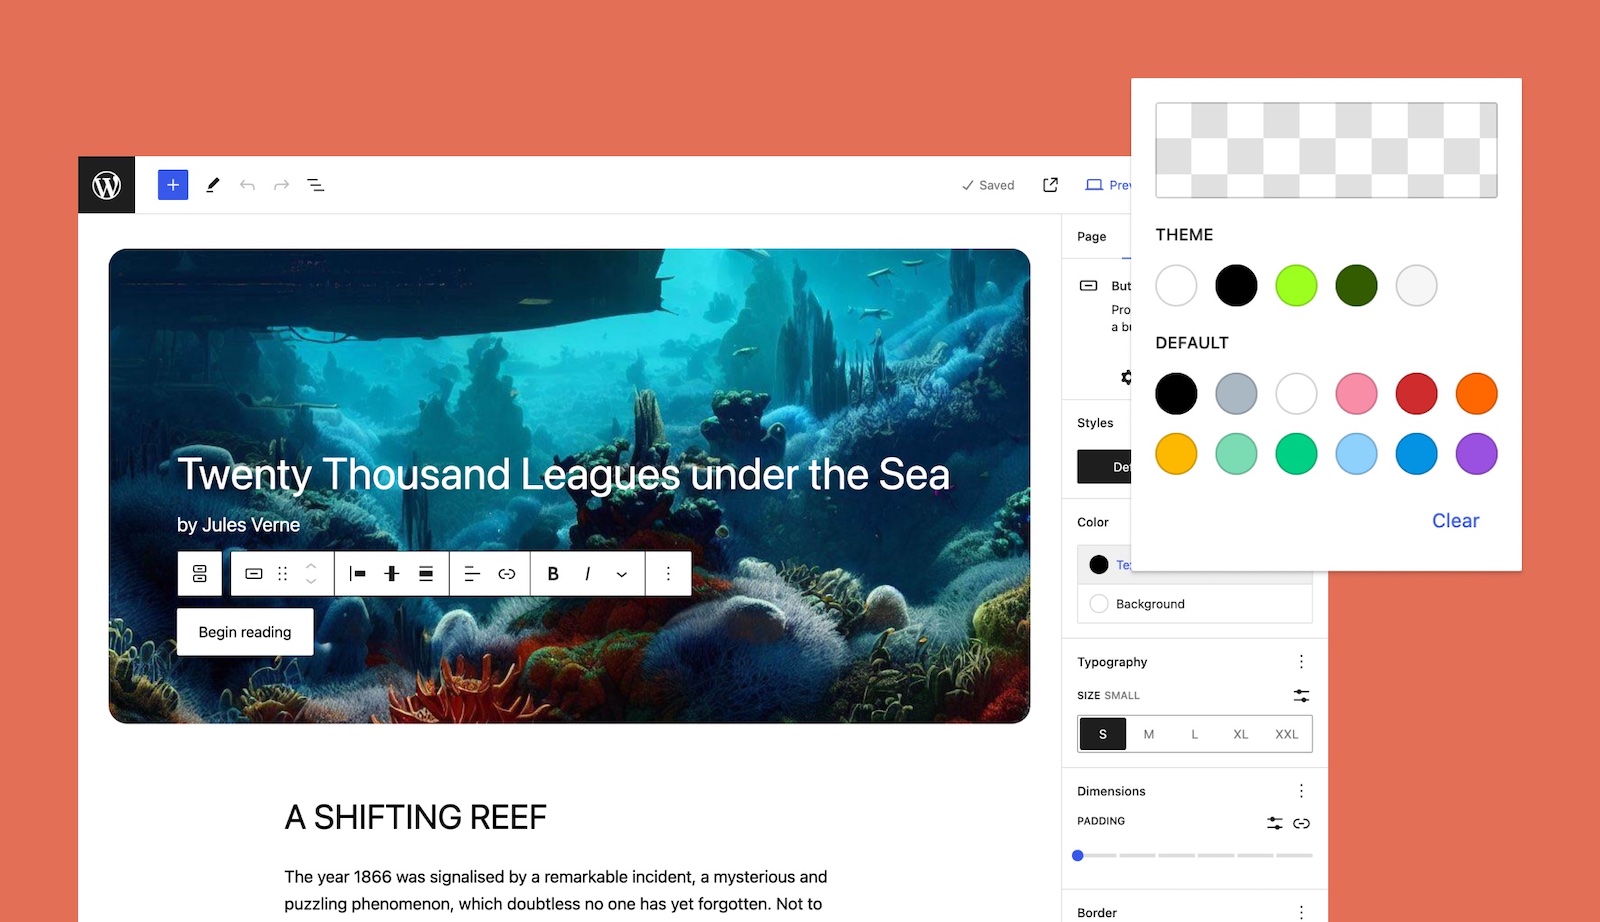
假设您有一个特定的按钮样式指南。当用户向文章或页面添加按钮时,他们应该可以访问主题的完整调色板。但是当他们将按钮放置在封面块中时,他们的颜色选择应该只有黑色或白色。本质上,您需要根据按钮块的位置或上下文来限制其颜色设置。
让我们暂时忽略上下文要求。以下是限制所有按钮块颜色设置的方法。
import { addFilter } from '@wordpress/hooks';

function restrictButtonBlockSettingsByLocation(
   settingValue,
   settingName,
   clientId,
   blockName
) {
    if ( blockName === 'core/button' ) {
        // 修改这些块设置。
        const modifiedBlockSettings = {
            'color.custom': false,
            'color.customGradient': false,
            'color.defaultGradients': false,
            'color.defaultPalette': false,
            'color.gradients.theme': [],
            'color.palette.theme': [
                {
                    color: '#ffffff',
                    name: 'Base',
                    slug: 'base',
                },
                {
                    color: '#000000',
                    name: 'Contrast',
                    slug: 'contrast',
                },
            ],
        };

        return modifiedBlockSettings[ settingName ];
    }

    return settingValue;
}

addFilter(
    'blockEditor.useSetting.before',
    'block-curation-examples/useSetting.before/button-location',
    restrictButtonBlockSettingsByLocation
);
上面的代码将禁用自定义颜色和渐变,同时将调色板简化为仅黑色(Contrast)和白色(Base)。这个回调函数应该类似于本文的第一个示例,其中 modifiedBlockSettings 对象包含设置名称及其新值。
要根据按钮块的上下文应用这些修改,您需要检查该块是否有任何父块。如果有,您可以获取这些父块的名称,如果其中一个父块是封面块,则应用限制。
幸运的是,@wordpress/block-editor 包为您提供了两个需要的选择器:getBlockParents 和 getBlockName。同样,您将使用 select 来检索它们。
import { select } from '@wordpress/hooks';

const { getBlockParents, getBlockName } = select( 'core/block-editor' );

// 获取块的父块,并查看是否有 'core/cover' 块。
const blockParents = getBlockParents( clientId, true );
const inCover = blockParents.some(
    ( parentId ) => getBlockName( parentId ) === 'core/cover'
);请注意,getBlockParents 选择器接受两个参数:块客户端 ID 和一个布尔参数,用于指定是按升序(true)还是降序(false)返回父块。在此示例中,顺序无关紧要。
定义了 isCover 后,您可以判断按钮块是否在封面块内。将所有内容放在一起,过滤器的最终代码应如下所示:
import { select } from '@wordpress/data';
import { addFilter } from '@wordpress/hooks';

function restrictButtonBlockSettingsByLocation(
    settingValue,
    settingName,
    clientId,
    blockName
) {
    if ( blockName === 'core/button' ) {
        const { getBlockParents, getBlockName } = select( 'core/block-editor' );

        // 获取块的父块,并查看是否有 'core/cover' 块。
        const blockParents = getBlockParents( clientId, true );
        const inCover = blockParents.some(
            ( parentId ) => getBlockName( parentId ) === 'core/cover'
        );

        // 修改这些块设置。
        const modifiedBlockSettings = {
            'color.custom': false,
            'color.customGradient': false,
            'color.defaultGradients': false,
            'color.defaultPalette': false,
            'color.gradients.theme': [],
            'color.palette.theme': [
                {
                    color: '#ffffff',
                    name: 'Base',
                    slug: 'base',
                },
                {
                    color: '#000000',
                    name: 'Contrast',
                    slug: 'contrast',
                },
            ],
        };

        if ( inCover && modifiedBlockSettings.hasOwnProperty( settingName ) ) {
            return modifiedBlockSettings[ settingName ];
        }
    }

    return settingValue;
}

addFilter(
    'blockEditor.useSetting.before',
    'block-curation-examples/useSetting.before/button-location',
    restrictButtonBlockSettingsByLocation
);
这是应用此过滤器后编辑器的前后对比视图。
现在您知道了如何根据上下文修改设置,您可以将此示例与用户权限、块属性或文章类型结合起来。使用这个单一的过滤器,有很多方法可以定制编辑器体验。
有关更多信息以及探索本文示例的工作插件,您可以在 GitHub 上查看 Editor Curation Examples 插件。块编辑器手册还包括一个 极好的资源,介绍了其他定制方法,并且每个 WordPress 版本都会添加更多方法。
那么,您将使用 blockEditor.useSetting.before 过滤器构建什么?是否有您希望看到但缺失的功能?请在评论中添加您的想法。