为 create-block 创建外部项目模板
create-block 包是一个极佳的省时工具,它允许您通过单一命令快速、一致地为项目创建自定义块。其核心功能其实很简单:接收一些值,处理这些值,然后生成将这些值插入其中的文件。
实际上,create-block 工具依赖于一个模板来告诉它在哪里可以找到所需的文件,在文件的哪个位置插入处理后的值,并定义所需的任何默认值。
默认模板为创建简单块提供了标准配置。当您开始创建外部项目模板时,create-block 的真正威力才变得显而易见。
外部项目模板提供了一种通过交互模式或可用命令行选项无法实现的精细控制级别,允许对脚手架文件的所有方面进行细粒度控制。
模板可以通过 --template 标志传递给 create-block,并且模板可以托管在 npmjs.com 上,就像新交互式 API 的入门指南中那样:
npx @wordpress/create-block@latest my-first-interactive-block --template @wordpress/create-block-interactive-template模板也可以通过传递模板所在目录的路径在本地引用:
npx @wordpress/create-block@latest custom-template-block -–template ./path/to/files这不仅是创建和测试模板的好方法,而且还可以在无法与整个社区共享代码的项目中利用它们。
准备工作
要使用 create-block 工具,您需要安装 Node.js。有关这方面的入门知识,请参阅关于设置 Node.js 开发工具的官方文档。
安装 Node 后,克隆本文的配套仓库:
git clone <a href="https://github.com/wptrainingteam/external-project-template.git">https://github.com/wptrainingteam/external-project-template.git</a>然后进入该目录:
cd external-project-template
项目内容应如下所示:
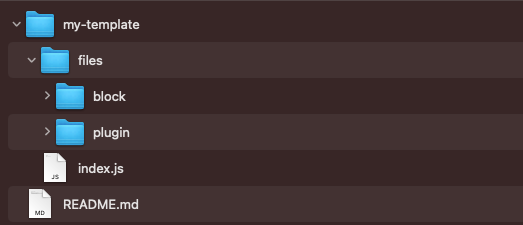
所有模板文件和配置都将存储在 my-template 目录中。它位于根目录内,因此您可以在同一位置轻松测试模板。
配置将存储在 index.js 文件中,而实际的模板文件(稍后会详细介绍)将存储在 files 目录及其子目录中。目录名称并不重要,您可以随意命名。重要的是,我们将用于生成插件的插件部分和块部分的文件分开存放。
定义模板
模板由两部分组成:包含配置对象的 index.js 文件,以及将用作工具创建的每个新插件或块的模式的 Mustache 模板。
Mustache 是一种无逻辑的模板语法。它可以用于 HTML、配置文件、源代码——任何东西。它通过使用哈希或对象中提供的值来扩展模板中的标签来工作。
配置
index.js 文件包含一个单独的对象,该对象被导出并用作模板的配置。这里有六个可用的属性,您可以在文档中阅读有关它们的信息。
由于这是 Node.js,您将使用 CommonJS 模块,而不是在大多数现代 WordPress JavaScript 项目中看到的 ES Modules。
首先导出一个空对象并导入一个稍后将使用的辅助函数。
将以下内容添加到您之前创建的 index.js 文件中:
/**
* Dependencies
*/

const { join } = require("path");

module.exports = {};
定义文件位置
接下来,您需要告诉模板在哪里可以找到它需要的文件。该仓库包含一个 files 目录,其中有两个用于 plugin 文件和 block 文件的内部目录。您可以使用 pluginTemplatesPath 和 blockTemplatesPath 分别定义这些位置。
现在就这样做:
/**
* Dependencies
*/

const { join } = require("path");

module.exports = {
 pluginTemplatesPath: join(__dirname, "files/plugin"),
 blockTemplatesPath: join(__dirname, "files/block"),
};
此时,您指向的是空目录,但这暂时没关系。稍后您将定义这些目录的内容。
还有另一个名为 assetsPath 的选项,用于不应被处理的静态资源,例如图像或字体。您没有使用此属性,但值得一提,您可以在文档中阅读更多相关信息。
defaultValues
大多数配置设置将使用此对象进行设置。它允许模板作者访问并为大量属性设置默认值。
虽然所有属性都添加到 defaultValues 对象中,但它们在概念上分为三组:项目、插件头部和块元数据。在文档中阅读有关所有属性的更多信息。
就我个人而言,我喜欢在本地设置中使用 Prettier。我将 VSCode 配置为在保存文件时格式化我的 JavaScript,并且我通常将其添加到项目中的 package.json 文件中。当运行 create-block 工具时,会自动为脚手架插件创建一个 package.json 文件。有几个可用的默认值来自定义包,但它们有非常具体的用途,例如定义依赖项、脚本以及 wp-env/scripts 集成。defaultValues.customPackageJSON 用作一个包罗万象的选项,允许模板作者根据需要扩展 package.json。
将以下内容添加到 index.js 文件中:
/**
 * Dependencies
 */
const { join } = require("path");

module.exports = {
 defaultValues: {
   customPackageJSON: {
     prettier: "@wordpress/prettier-config",
   },
 },
 pluginTemplatesPath: join(__dirname, "files/plugin"),
 blockTemplatesPath: join(__dirname, "files/block"),
};
运行时,这会将 "prettier": "@wordpress/prettier-config", 添加到创建的 package.json 中。
接下来,您将为 namespace、version 和 description 添加默认值。请记住,这些是默认值,仍然可以使用适当的标志覆盖。
/**
* Dependencies
*/
const { join } = require("path");

module.exports = {
 defaultValues: {
   version: "1.0.0",
   namespace: "developer-blog",
   description:
     "A plugin created by the create-block tool using a custom external project template.",
   customPackageJSON: {
     prettier: "@wordpress/prettier-config",
   },
 },
 pluginTemplatesPath: join(__dirname, "files/plugin"),
 blockTemplatesPath: join(__dirname, "files/block"),
};
变体
变体是创建模板变体的非常强大的方法。它们与特定模板相关联,并通过 --variant 标志访问。例如,默认主题有 static 和 dynamic 变体。每个变体产生一组不同的文件。
变体包含它们自己的一组 defaultValues,这些值与主值组合并覆盖主值。这允许模板作者更改配置的某些部分以满足特定变体的需求。
您的模板将包含两个变体:dynamic 和 interactive。前者生成一个简单的动态块,而后者生成一个利用 WordPress 6.5 中包含的新交互式 API 的动态块。
每个变体都是 variants 属性下的一个对象,包含要与 defaultValues 组合的特定值。
/**
 * Dependencies
 */
const { join } = require("path");

module.exports = {
 defaultValues: {
   version: "1.0.0",
   namespace: "developer-blog",
   description:
     "A plugin created by the create-block tool using a custom external project template.",
   render: "file:./render.php",
   customPackageJSON: {
     prettier: "@wordpress/prettier-config",
   },
 },
 variants: {
   dynamic: {},
   interactive: {},
 },
 pluginTemplatesPath: join(__dirname, "files/plugin"),
 blockTemplatesPath: join(__dirname, "files/block"),
};
通常,第一个变体留空(在您的情况下是 dynamic),因为如果没有 --variant 传递给命令,它将用作默认值。从哲学角度来看,这是有道理的,因为 defaultValues 应该是创建插件所需的所有值。
接下来,您将自定义添加到 interactive 变体:
/**
 * Dependencies
*/
const { join } = require("path");

module.exports = {
 defaultValues: {
   version: "1.0.0",
   namespace: "developer-blog",
   description:
     "A plugin created by the create-block tool using a custom external project template.",
   render: "file:./render.php",
   customPackageJSON: {
     prettier: "@wordpress/prettier-config",
   },
 },
 variants: {
   dynamic: {},
   interactive: {
     viewScriptModule: "file:./view.js",
     customScripts: {
       build: "wp-scripts build --experimental-modules",
       start: "wp-scripts start --experimental-modules",
     },
     supports: {
       interactive: true,
     },
   },
 },
 pluginTemplatesPath: join(__dirname, "files/plugin"),
 blockTemplatesPath: join(__dirname, "files/block"),
};
此变体添加了 viewScriptModule 属性,并将 block.json 中的 supports.interactive 设置为 true。此外,它还更改了 package.json 中的 build 和 start 脚本。这些更改都是启用交互式 API 所必需的,这超出了本文的范围。
在官方文档中了解更多关于交互式 API 的信息。
Mustache 模板
Mustache 模板用作创建生成插件所需的各种文件的模式。它们分为两种类型:插件和块。
插件文件
插件文件输出到生成插件的根目录,例如主插件 PHP 文件、readme.txt 和 composer.json。
块文件
这些是将输出到插件 src 目录中的文件。这是插件文件输出的地方,例如 block.json、index.js、edit.js 和 render.php。
无论哪种类型,每个模板都必须具有 .mustache 扩展名。如果没有,create-block 工具将忽略该文件。
模板变量
查看 files/plugin 目录,您将看到五个文件,它们都有 .mustache 扩展名:
- .editorconfig.mustache
- .eslintrc.mustache
- .gitignore.mustache
- readme.txt.mustache
- $slug.php.mustache
这些文件中的每一个都将添加到插件的根目录中,但不带 .mustache 扩展名。您可能想知道为什么最后一个文件的名称中有 $slug。如果您查看其内部或 readme.txt.mustache,您可能还会想知道这种奇怪的符号是什么:
<?php
/**
 * Plugin Name:       {{title}}
 */
这些项目是 Mustache 模板变量,它们被模板定义的、用户传递的或由 create-block 工具根据其他值派生的值替换。
例如,如果您运行以下命令:
npx @wordpress/create-block my-example-template-block --template ./my-template$slug.php.mustache 将变为 my-example-template-block.php,并且 {{title}} 变量将被替换为 My Example Template Block,这是从传递给工具的 slug 生成的。
这些是可用于任何模板中的变量,它们会被值替换:
- {{namespace}},
- {{namespaceSnakeCase}}
- {{namespacePascalCase}}
- {{slug}}
- {{slugPascalCase}}
- {{slugSnakeCase}}
- {{title}}
- {{description}}
- {{author}}
- {{pluginURI}}
- {{license}}
- {{licenseURI}}
- {{domainPath}}
- {{updateURI}}
- {{version}}
- {{textdomain}}
还有其他变量是根据您之前定义的变体创建的。每个都变成一个布尔变量,指示变体的选择状态。在您的模板中,将定义两个:{{isDynamicVariant}} 和 {{isInteractiveVariant}}。如果传递了 --variant interactive,那么 {{isInteractiveVariant}} 将为 true,而 {{isDynamicVariant}} 将为 false。如果没有传递 --variant 或值设置为 dynamic,则情况相反。
这是一个强大的功能,使模板作者能够根据这些变量有条件地输出其文件中的内容。Mustache 通过使用以下格式支持条件模板变量:
{{#VariableVar}}
If VariableVar is true, then this content is output
{{/VariableVar}}
在两种情况下,这非常有帮助:
第一种是当您只需要给定变体的文件时。在您的模板中,有一个 view.js.mustache 文件,仅在使用 interactive 变体时才需要。现在打开该文件,您将看到以下代码:
/**
 * WordPress dependencies
 */
import { store } from '@wordpress/interactivity';

store( '{{slug}}', {
	state: {},
	actions: {},
	callbacks: {},
} );
运行以下命令生成动态块:
npx @wordpress/create-block my-example-template-block --template ./my-template请注意,文件已生成,这不是期望的结果。将条件标签添加到模板中以检查 {{isInteractiveVariant}} 是否处于活动状态:
{{#isInteractiveVariant}}
/**
 * WordPress dependencies
 */
import { store } from '@wordpress/interactivity';

store( '{{slug}}', {
	state: {},
	actions: {},
	callbacks: {},
} );
{{/isInteractiveVariant}}
再次运行该命令,您将看到文件没有输出,因为条件未验证为真,并且创建了一个空文件。create-block 工具足够智能,会检查以确保任何文件都有内容,如果没有,则不会将文件写入文件系统。
另一种情况是文件的内容因变体而异。在我们的例子中,render.php 文件将根据变体有略微不同的内容,但有些内容总是输出。
<?php
/**
 * PHP file to use when rendering the block type on the server to show on the front end.
 *
 * The following variables are exposed to the file:
 *     $attributes (array): The block attributes.
 *     $content (string): The block default content.
 *     $block (WP_Block): The block instance.
 *
 * @see https://github.com/WordPress/gutenberg/blob/trunk/docs/reference-guides/block-api/block-metadata.md#render
 */

{{#isInteractiveVariant}}
// Define some global state
wp_interactivity_state(
	'{{slug}}',
	array()
);

// Define some context.
$context = array();
?>
<p <?php echo wp_kses_data( get_block_wrapper_attributes() ); ?>
	data-wp-interactive="{{slug}}"
	<?php echo wp_interactivity_data_wp_context( $context ); ?>
>
	<?php esc_html_e( '{{title}} – hello from an interactive block!', '{{textdomain}}' ); ?>
</p>
{{/isInteractiveVariant}}
{{#isDynamicVariant}}
?>
<p <?php echo wp_kses_data( get_block_wrapper_attributes() ); ?>>
	<?php esc_html_e( '{{title}} – hello from a dynamic block!', '{{textdomain}}' ); ?>
</p>
{{/isDynamicVariant}}
上面的模板将始终包含出现在文件顶部的内容,但根据哪个变体处于活动状态,它将输出不同的内容。
转换器
transformer 属性是 defaultValues 的一部分,但有特殊用途。它接受一个函数,允许模板作者访问 create-block 工具创建的所有变量,然后返回修改后的值。
使用以下内容更新 index.js 文件:
/**
 * Dependencies
 */
const { join } = require("path");

module.exports = {
 defaultValues: {
   transformer: (view) => {
     console.log(view);
     return view;
   },
   version: "1.0.0",
   namespace: "developer-blog",
   description:
     "A plugin created by the create-block tool using a custom external project template.",
   render: "file:./render.php",
   customPackageJSON: {
     prettier: "@wordpress/prettier-config",
   },
 },
 variants: {
   dynamic: {},
   interactive: {
     viewScriptModule: "file:./view.js",
     customScripts: {
       build: "wp-scripts build --experimental-modules",
       start: "wp-scripts start --experimental-modules",
     },
     supports: {
       interactive: true,
     },
   },
 },
 pluginTemplatesPath: join(__dirname, "files/plugin"),
 blockTemplatesPath: join(__dirname, "files/block"),
};
再次运行此命令:
npx @wordpress/create-block my-example-template-block --template ./my-template在您的终端中,您将看到一个包含所有可访问变量的大型对象。
{
  '$schema': 'https://schemas.wp.org/trunk/block.json',
  apiVersion: 3,
  plugin: true,
  namespace: 'developer-blog',
  slug: 'my-example-template-block',
  title: 'My Example Template Block',
  description: 'A plugin created by the create-block tool using a custom external project template.',
  dashicon: undefined,
  category: 'widgets',
  attributes: undefined,
  supports: undefined,
  author: 'The WordPress Contributors',
  pluginURI: undefined,
  license: 'GPL-2.0-or-later',
  licenseURI: 'https://www.gnu.org/licenses/gpl-2.0.html',
  domainPath: undefined,
  updateURI: undefined,
  version: '1.0.0',
  wpScripts: true,
  wpEnv: false,
  npmDependencies: [],
  npmDevDependencies: undefined,
  customScripts: {},
  folderName: './src',
  editorScript: 'file:./index.js',
  editorStyle: 'file:./index.css',
  style: 'file:./style-index.css',
  viewStyle: undefined,
  render: 'file:./render.php',
  viewScriptModule: undefined,
  viewScript: undefined,
  variantVars: { isDynamicVariant: true, isInteractiveVariant: false },
  customPackageJSON: { prettier: '@wordpress/prettier-config' },
  customBlockJSON: undefined,
  example: undefined,
  textdomain: 'my-example-template-block'
}您可能出于任何原因想要访问和修改这些变量。例如,Block Development Examples 仓库使用它来向 slug、title 和一些其他项目添加生成的值。
另一个用例是创建 create-block 本身不支持的模板变量。在您的模板中,您提供了一个使用 WordPress 6.5 中发布的交互式 API 的变体。在这种情况下,您将 Requires at least 插件头部设置为要求 WordPress 6.5 是有意义的。没有现成的 defaultValue 可供您覆盖,因此您将添加自己的并在模板中使用它。
首先,将 $slug.php.mustache 中的 Requires at least header 更新为使用以下内容:
* Requires at least: