创建存储文章元数据的自定义区块
文章元数据是 WordPress 开发者工具箱中最常用的工具之一。在 WordPress 5.0 和区块编辑器发布之前,它是存储与文章实例关联数据的唯一方式。开发者会在文章编辑器中添加一个元数据框来允许数据输入,然后在主题或插件模板中访问这些存储的数据以进行展示。
现在,随着创建自定义区块和区块模式的能力增强,你并不总是需要将数据存储在文章元数据中,你可以使用区块属性并将其作为文章内容的一部分存储。关于何时使用文章元数据或文章内容的哲学问题有点超出了本文的范围,但概括来说,答案很可能在于存储的数据是否需要被查询,或者是否需要在与其关联的文章类型的单一模板之外显示。
一个真实用例
在本教程中,假设你有一个客户,其网站有一个名为“产品”的现有自定义文章类型。他们希望能够为产品输入推荐语,然后在网站首页上显示最近五个有推荐语的产品的推荐语。推荐语还需要存储作者姓名和网站 URL,但它们只显示在单一产品模板上。
定义我们的方法
根据需求规格,你知道需要存储三条数据:
- 推荐语内容。
- 作者姓名。
- 作者网站 URL。
你还知道网站所有者希望显示最近五个有推荐语的产品的推荐语内容,因此可以推断推荐语内容需要存储在文章元数据中,因为意图是对其进行查询。作者姓名和 URL 可以作为区块的一部分存储在文章内容中,因为它们永远不会被查询,并且只显示在单一项目模板上。
既然知道了在哪里存储这些项目,是时候确定用什么来存储它们了。
因为推荐语只是一些引用的文本,所以“引用”和“拉引”区块是很好的候选。你甚至可以使用block filters扩展它们来存储作者的电子邮件和网站 URL。然而,在这种情况下,你需要让区块将推荐语内容保存到文章元数据中,而这些区块将其内容存储在文章内容中。此外,你需要使用get_post_meta()函数直接从 WordPress 检索推荐语内容,因此你需要使用动态区块而不是静态区块。
看来解决方案是创建一个自定义的动态区块。
设置文章元数据
你虚构的客户已经在其网站上注册了一个产品文章类型,使用以下代码片段。
register_post_type(
	'product',
	array(
		'labels'       => array(
			'name'          => __( 'Products', 'tutorial' ),
			'singular_name' => __( 'Product', 'tutorial' ),
		),
		'public'       => true,
		'has_archive'  => true,
		'show_in_rest' => true,
		'supports'     => array(
			'title',
			'editor',
			'thumbnail',
			'excerpt',
			'custom-fields',
		),
	)
);
为了在文章编辑器中访问任何文章元数据,需要将其暴露给 REST API。这可以通过使用register_post_meta函数并将show_in_rest设置为 true 来完成。下面的代码片段将为product自定义文章类型注册testimonial文章元数据,并通过将wp_kses_post函数传递给sanitize_callback参数来确保保存的数据已针对数据库进行清理。
register_post_meta(
	'product',
	'testimonial',
	array(
		'show_in_rest'       => true,
		'single'             => true,
		'type'               => 'string',
		'sanitize_callback'  => 'wp_kses_post',
	)
);
搭建区块
现在,已经为现有文章类型注册了文章元数据,你需要创建一个与之交互的区块。你可以使用@wordpress/create-block工具来创建一个将注册该区块的插件。请注意,完全可以从主题内部注册一个区块,在某些情况下,这种方法可能是更好的选择。出于本教程的目的,代码将包含在一个插件中,以减少所需的设置量。
在wp-content/plugins目录中运行以下命令,以搭建一个包含单个动态区块的新插件。
npx @wordpress/create-block post-meta-testimonial --variant dynamic --namespace tutorial --category text --short-description "A block quote style testimonial that saves to post meta."你在这里使用--variant标志来告诉工具你想要生成一个动态区块,以便在 PHP 中渲染前端,而不是将区块保存到文章内容中。其他标志定义了区块的一些其他属性,例如它应该出现在哪个类别下、在区块编辑器中显示的描述以及注册区块时使用的命名空间。
有关 create-block 包及其选项的更多信息,请参阅官方文档。
命令运行完成后,plugins目录中将出现一个名为post-meta-tutorial的新目录,其中包含一个可用的动态区块。请务必在继续之前转到插件页面并激活它。
在你选择的终端中,从wp-content/plugins/post-meta-tutorial目录内运行npm run start来启动区块的构建过程。
start命令是用于构建区块的@wordpress/scripts包提供的众多命令之一。
此命令将监视src目录中的文件更改,并根据需要重新编译它们。
现在,你可以将搭建的区块插入到编辑器中。

修改 block.json
现在你已经搭建了区块并运行了构建过程,可以开始对搭建的内容进行自定义。
首先定义两个属性来存储作者姓名和电子邮件:authorName和authorURL。这两个属性的类型都是string,没有默认值。
"attributes": {
	"authorName": {
		"type": "string"
	},
	"authorURL": {
		"type": "string"
	}
},有关区块属性的更多信息,请参阅官方文档。
注意:从技术上讲,有一种方法可以通过 block.json 将区块属性连接到文章元数据,但它已被弃用,不应使用。
接下来,你需要能够获取有关区块位置的信息。更具体地说,你需要获取当前文章 ID 和类型。这可以通过usesContext属性来完成。
此属性允许区块访问其祖先或父级提供的信息。在本例中,我们访问的是区块编辑器本身提供的信息,任何区块都可以使用。继续将postId和postType添加到usesContext属性中。
"usesContext": ["postId", "postType"]有关usesContext的更多信息,请参阅官方文档。
接下来,让我们更改与此区块关联的图标,使其更能代表其用途。我们可以在icon属性中进行更改。
"icon": "format-quote"由于此区块访问整篇文章的单个元数据,因此一篇文章中只应允许此区块的一个实例。你可以通过在supports属性中将multiple设置为false来管理这一点。
"supports": {
	"html": false,
	"multiple": false
},
如果你想在区块插入器中预览区块,也可以添加一个 example 属性。
"example": {
	"attributes": {
		"authorName": "WordPress",
		"authorURL": "developer.wordpress.org/news"
	}
},
你可以随意调整 block.json 文件中的任何其他属性,但此时,你应该有一个内容类似于这样的block.json文件。
{
	"$schema": "https://schemas.wp.org/trunk/block.json",
	"apiVersion": 2,
	"name": "tutorial/post-meta-testimonial",
	"version": "0.1.0",
	"title": "Post Meta Testimonial",
	"category": "text",
	"icon": "format-quote",
	"description": "A block quote style testimonial that saves to post meta.",
	"supports": {
		"html": false,
		"multiple": false
	},
	"example": {
		"attributes": {
			"authorName": "WordPress",
			"authorURL": "developer.wordpress.org/news"
		}
	},
	"attributes": {
		"authorName": {
			"type": "string"
		},
		"authorURL": {
			"type": "string"
		}
	},
	"usesContext": [ "postId", "postType" ],
	"textdomain": "post-meta-testimonial",
	"editorScript": "file:./index.js",
	"editorStyle": "file:./index.css",
	"style": "file:./style-index.css",
	"render": "file:./render.php"
}
在 edit.js 中创建用户界面
现在block.json已经更新,你可以开始研究区块在区块编辑器中的功能。打开搭建的edit.js文件。通常这个文件有大量注释,但出于本教程的目的,它们已被简化,所以现在文件看起来像这样。
/**
 * WordPress dependencies
 */
import { __ } from '@wordpress/i18n';
import { useBlockProps } from '@wordpress/block-editor';
/**
 * Internal dependencies
 */
import './editor.scss';
/**
 * The edit function describes the structure of your block in the context of the
 * editor. This represents what the editor will render when the block is used.
 *
 * @return {WPElement} Element to render.
 */
export default function Edit() {
	return (
		<p { ...useBlockProps() }>
			{ __(
				'Post Meta Testimonial – hello from the editor!',
				'post-meta-testimonial'
			) }
		</p>
	);
}
更新标记和样式
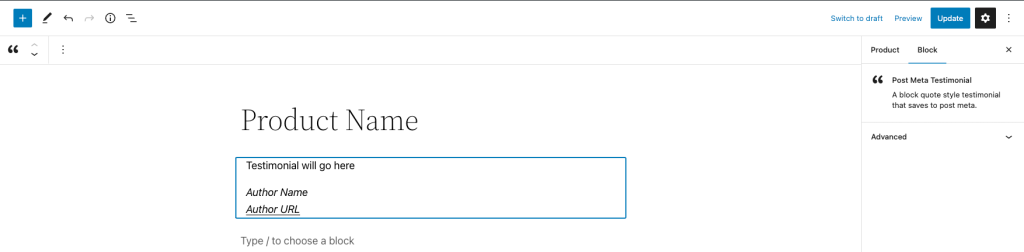
首先更新 JSX,使用一个包含p和cite标签的blockquote标签。cite标签将包含两个span标签,分别包含作者姓名和作者 URL,后者用a标签包裹。这将是前端显示的相同标记。
export default function Edit() {
	return (
		<blockquote { ...useBlockProps() }>
			<p>Testimonial will go here</p>
			<cite>
				<span>Author Name</span>
				<br />
				<span>
					<a href="#">Author URL</a>
				</span>
			</cite>
		</blockquote>
	);
}
接下来,将以下 CSS 添加到style.scss文件中,为你的区块提供引用的外观。
.wp-block-tutorial-post-meta-testimonial {
	border-left: 0.25em solid;
	margin: 0 0 1.75em;
	padding-left: 1em;
	border-width: 1px;
}
你现在应该有一个看起来像这样的区块:
添加组件和交互性
现在标记和样式已经就位,你可以开始添加一些交互性。首先,更新 Edit 组件以访问传递给它的项目。Edit 组件接收一个props对象,你可以使用对象解构从中提取项目。你需要访问attributes对象、setAttributes函数以及context对象的内容。
export default function Edit( {
	attributes,
	setAttributes,
	context: { postType, postId },
} ) {
	return (
		<blockquote { ...useBlockProps() }>
			<p>Testimonial will go here</p>
			<cite>
				<span>Author Name</span>
				<br />
				<span>
					<a href="#">Author URL</a>
				</span>
			</cite>
		</blockquote>
	);
}接下来,你需要为用户提供一些输入信息的位置。虽然你可以使用一些输入字段组件,例如TextControl,但RichText组件在这里是一个很好的选择,因为它提供了出色的所见即所得体验,并提供了一些基本的格式控制。
从@wordpress/block-editor包中导入RichText组件。
import { useBlockProps, RichText } from '@wordpress/block-editor';RichText组件支持许多属性,但本教程只需要以下六个:
tagName:可编辑元素的标签名。value:字段的内容。onChange:值更改时调用。placeholder:字段为空时显示的占位符文本。allowedFormats:允许的格式列表,例如粗体、斜体等。disableLineBreaks:实例是否允许换行。
你需要三个 RichText 组件实例来管理此区块管理的信息。一个用于推荐语内容,另外两个用于存储作者信息的属性。
使用以下内容更新cite标签的内容。
export default function Edit( {
	attributes: { authorName, authorURL },
	setAttributes,
	context: { postType, postId },
} ) {
	return (
		<blockquote { ...useBlockProps() }>
			<p>Testimonial goes here</p>
			<cite>
				<RichText
					tagName="span"
					placeholder={ __( 'Author name', 'tutorial' ) }
					allowedFormats={ [] }
					disableLineBreaks
					value={ authorName }
					onChange={ ( newAuthorName ) =>
						setAttributes( { authorName: newAuthorName } )
					}
				/>
				<br />
				<span>
					<RichText
						tagName="a"
						placeholder={ __( 'Author URL', 'tutorial' ) }
						allowedFormats={ [] }
						disableLineBreaks
						value={ authorURL }
						onChange={ ( newAuthorURL ) =>
							setAttributes( { authorURL: newAuthorURL } )
						}
					/>
				</span>
			</cite>
		</blockquote>
	);
}有关该组件的更多信息,请参见源代码。RichText
获取并更新后元游戏
在你为RichText组件填充用于撰写推荐内容的props之前,你需要先访问当前帖子的帖子元。要做到这一点,从包中导入钩子。useEntityProp@wordpress/core-data
Import useEntityProp.import { useEntityProp } from '@wordpress/core-data';
该钩子接受四个参数:
kind:那种实体。name:实体名称。prop:物业名称。id: 一个用于替代上下文提供的实体ID。
在这种情况下,你将 kind 参数设为 ,参数 为访问 Product 帖子类型的属性,参数为 。postTypenameproductpropmeta
最后,你可以将块从对象那里接收到的参数传递给你,以确保你获取到所引用帖子实例的特定帖子元值。这很重要,因为无论块子是在帖子内容、网站编辑器中,还是查询循环块模板中,都能检索到正确的帖子元值。postIdcontextid
useEntityProp返回一个数组,包含第一个索引中查询的数据,以及第二个索引中更新数据的函数。对于用过这个钩子的人来说,这会很熟悉。useState
你可以用数组结构化提取这些项,并为它们赋予与功能相对应的名称;在此例中,分别是 和 。metaupdateMeta
最后,变量是一个包含该帖子类型注册的所有帖子元的对象。你只需要使用已注册的元环境,并且同样可以使用对象结构来访问它。metatestimonial
由于推荐元内容只注册在产品帖子类型上,使用它在其他内容类型上时会遇到错误。
Retrieve the testimonial meta from the post.export default function Edit( {
	attributes: { authorName, authorURL },
	setAttributes,
	context: { postType, postId },
} ) {
	const [ meta, updateMeta ] = useEntityProp(
		'postType',
		'product',
		'meta',
		postId
	);

	const { testimonial } = meta;
	return (
		<blockquote { ...useBlockProps() }>
			<p>Testimonial goes here</p>
			<cite>
				<RichText
					tagName="span"
					placeholder={ __( 'Author name', 'tutorial' ) }
					allowedFormats={ [] }
					disableLineBreaks
					value={ authorName }
					onChange={ ( newAuthorName ) =>
						setAttributes( { authorName: newAuthorName } )
					}
				/>
				<br />
				<span>
					<RichText
						tagName="a"
						placeholder={ __( 'Author URL', 'tutorial' ) }
						allowedFormats={ [] }
						disableLineBreaks
						value={ authorURL }
						onChange={ ( newAuthorURL ) =>
							setAttributes( { authorURL: newAuthorURL } )
						}
					/>
				</span>
			</cite>
		</blockquote>
	);
}
现在你已经有了所需的内容,就可以填充用于推荐内容的RichText组件。设置属性使用该变量,并在里面添加调用该函数。这个函数需要一个元对象,你要确保在更新推荐信时不会影响其他元对象。valuetestimonialonChangeupdateMeta
这可以通过使用扩散算子将所有元元素添加到新对象中来实现。通过添加属性并设置值,效果是覆盖元对象中所有具有相同键的项。实际上,你是在创建一个新对象,所有现有属性都保持不变,除了testimonialmetatestimonial
Add RichText component to mange the testimonial contentexport default function Edit( {
	attributes: { authorName, authorURL },
	setAttributes,
	context: { postType, postId },
} ) {
	const [ meta, updateMeta ] = useEntityProp(
		'postType',
		'product',
		'meta',
		postId
	);

	const { testimonial } = meta;
	return (
		<blockquote { ...useBlockProps() }>
			<RichText
				placeholder={ __( 'Testimonial goes here', 'tutorial' ) }
				tagName="p"
				value={ testimonial }
				onChange={ ( newTestimonialContent ) =>
					updateMeta( {
						...meta,
						testimonial: newTestimonialContent,
					} )
				}
			/>
			<cite>
				<RichText
					tagName="span"
					placeholder={ __( 'Author name', 'tutorial' ) }
					allowedFormats={ [] }
					disableLineBreaks
					value={ authorName }
					onChange={ ( newAuthorName ) =>
						setAttributes( { authorName: newAuthorName } )
					}
				/>
				<br />
				<span>
					<RichText
						tagName="a"
						placeholder={ __( 'Author URL', 'tutorial' ) }
						allowedFormats={ [] }
						disableLineBreaks
						value={ authorURL }
						onChange={ ( newAuthorURL ) =>
							setAttributes( { authorURL: newAuthorURL } )
						}
					/>
				</span>
			</cite>
		</blockquote>
	);
}
此时,你应该有一个工作模块,可以显示并允许更新推荐内容。你应该注意到,当你更新推荐内容时,帖子元内容不会立即被保存,而是在帖子保存后,这些更改会在数据库中生效。
render.php前端更新
要在前端显示推荐内容,你需要对动态块用来渲染标记的文件做一些修改。render.php
这个文件应被视为模块前端的模板,因此只应包含用于显示的标记,类似于函数中使用的模板,而不是定义 PHP 中函数或类的最佳位置。get_template_part
打开脚手架文件,应该是这样的render.php
Scaffolded render.php<p <?php echo get_block_wrapper_attributes(); ?>>
	<?php esc_html_e( 'Post Meta Testimonial – hello from a dynamic block!', 'post-meta-testimonial' ); ?>
</p>
接下来,更新标记,使其与JSX中完成的匹配。
Update the markup to match the JSX<blockquote <?php echo get_block_wrapper_attributes(); ?>>
	<p>Testimonial will go here</p>
	<cite>
		<span>Author Name</span>
		<br />
		<span>
			<a href="#">Author URL</a>
		</span>
	</cite>
</blockquote>
render.php可访问与区块相关的三个变量:
$attributes:包含所有块属性的数组$content:内层块内容。$block:块实例的参考
在本教程中,你需要使用 来获取 和 信息,并获取传递的帖子 ID$attributesauthorNameauthorEmail$blockusesContext
Access the attributes from the block.$author_name = $attributes['authorName'];
$author_url  = $attributes['authorURL'];
关于推荐内容,你将使用该功能来检索推荐文的帖子元。为此,你需要获取当前的帖子编号。get_post_meta()
从数组中获取帖子ID,这个数组里包含了你在属性中添加的项,然后调用传递帖子ID、键名和表示只返回一个帖子元的函数。$block->contextusesContextblock.jsonget_post_meta()true
Access the testimonial post meta.$testimonial = get_post_meta( $block->context['postId'], 'testimonial', true );
$author_name = $attributes['authorName'];
这个区块的标记非常简单,但现在你有一个工作区块,可以在前端显示后期元。
Final render.php<?php
global $post;
$testimonial = get_post_meta( $post->ID, 'testimonial', true );
$author_name = $attributes['authorName'];
$author_url  = $attributes['authorURL'];
?>
<blockquote <?php echo get_block_wrapper_attributes(); ?>>
	<p><?php echo esc_html( $testimonial ); ?></p>
	<cite>
		<span><?php echo esc_html( $author_name ); ?></span>
		<br />
		<span>
			<a href="<?php echo esc_url( $author_url ); ?>" target="_blank" rel="noopener noreferrer"><?php echo esc_html( $author_url ); ?></a>
		</span>
	</cite>
</blockquote>
使用支持后元环境的方块有很多层次和用例,但希望这个教程能为你提供一个良好的基础。
你希望未来的教程中能看到哪些后元相关主题?